• Menu
  • Skip to right header navigation
  • Skip to primary navigation
  • Skip to secondary navigation
  • Skip to main content
  • Skip to primary sidebar

Tigers Eye Handmade

Patterns & Resources for Makers

  • My account
  • Cart
  • Checkout
  • Contact Us
  • About
  • Blog
  • Pattern Shop
  • Cart
  • About
  • Blog
  • Pattern Shop
  • Cart
how to gauge swatch

How To Make A Gauge Swatch For Crochet

how to gauge swatch

January 15, 2022 //  by tigerseyehandmade

Can’t you just start your project already if you follow the pattern using the prescribed hook size?! Why even bother with a gauge swatch—it takes too much time!

Nope… you really need to do your gauge swatch! Keep on reading to learn why.

Gauge swatching is critical to getting the best possible results with your finished project AND ensuring it looks good and fits correctly. If you’ve never gauge swatched before, or you have but you need a little help, this post will explain exactly how to do it.

Disclosure: some of the links in this post are affiliate links and if you go through them to make a purchase I will earn a small commission at no additional cost to you. 

4 Reasons Why You Need To Gauge Swatch

  1. If your gauge is different than the designer of the pattern you’re following, then your finished garment WILL NOT match the intended measurements for your size.
  2. It’s actually pretty common for a designer’s gauge to be different than yours. And, there’s nothing wrong with you if you need a different size hook to get the same results. I’ve had testers go up or down 2-3 hook sizes to match my gauge. We’re all different!
    • The way each of us hold and tension the yarn can vary!
    • Different yarns within the same category (like 4-worsted) also have a big range in thickness. This can really impact gauge!
  3. Not all crochet hooks are created equal. Surprise… they aren’t always perfectly sized. I’ve noticed variations between some of the hooks I have in my own collection.
    • If you want to double check the size of your hooks, there are hook/needle size tools available to measure with!
  4. Gauge swatching gives you a preview of how your chosen yarn will work with the pattern.
    • What does the fabric look like? Does it have a nice drape, or is it too stiff, or too loose/holey?
    • If there’s texture, does it show well and hold shape?
    • How does your yarn respond to blocking? *There are instructions in this post on how to block your swatch. (PLZ READ ME IF YOU NEED HELP WITH BLOCKING GARMENTS)

How to Gauge Swatch: Step by Step Instructions

Step 1: Choose a yarn that is the correct weight as indicated in your pattern.

Step 2: Start with the recommended crochet hook size from the pattern.

Step 3: Make your swatch. Always swatch flat for projects worked flat, swatch in the round for projects worked in the round.

Some patterns have specific gauge swatch instructions. If that’s the case, follow those.

If there aren’t any swatch instructions in the pattern:

Find the listed gauge in the pattern. It will state how many stitches and rows are in 4 inches/10 cm. It should also list the stitch pattern used for the gauge.

For example: 12 sts (stitches) / 10 rows in dc (double crochet) in 4 inches/10 cm

I always like to add at least 2 additional stitches, and 1 to 2 extra rows to the given amount for my swatch for the most accurate measurement. (The edge stitches/turning chains can be a little wonky.)

For a gauge of 12 stitches, I would chain: 12 + 2 extra sts + 3 sts for the turning chain = 15 sts (or however many turning chs indicated in the pattern, depending on whether or not the chain counts as a stitch)

Work in the prescribed stitch pattern for 1 to 2 more rows than indicated in the prescribed guage. From our example (12 sts/10 rows), that would be 10 rows + 2 = 12 rows in dc

Step 4: Block and dry your swatch.

  1. Wet the swatch by soaking it in water.
  2. Gently squeeze out excess water
  3. Press with a wash cloth or towel.
  4. Lay flat to dry. Be sure to let your swatch dry completely before measuring. (to speed things up you can use a hair dryer on the cool setting, or aim a fan on your swatch)

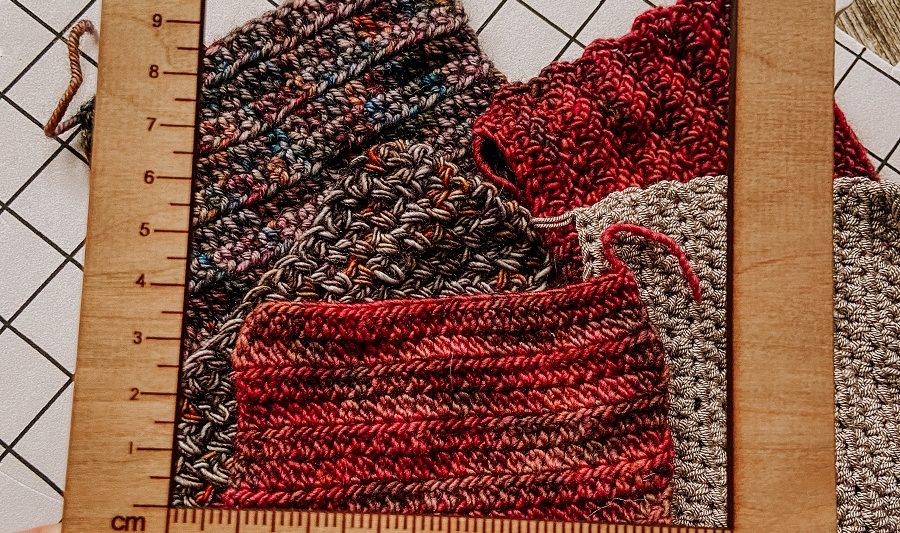
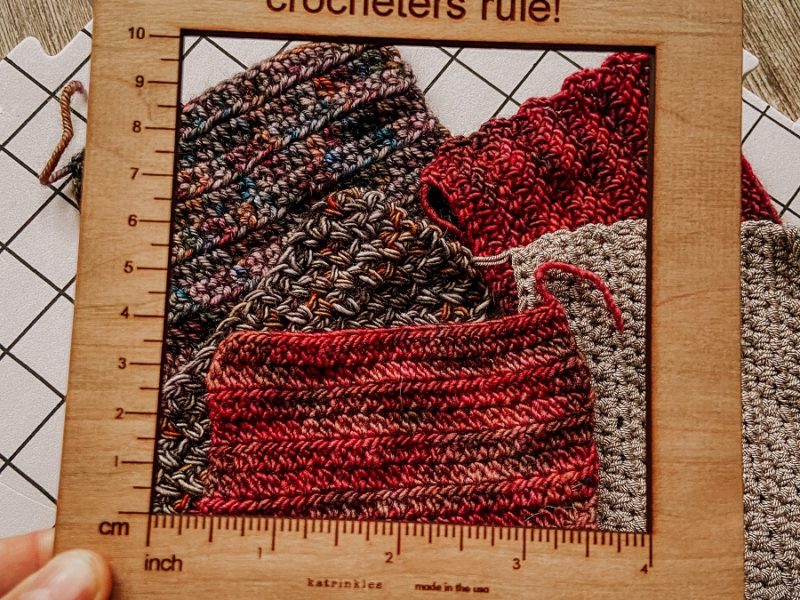
Step 5: Measure your dry swatch with measuring tape or a gauge ruler. Hold the ruler horizontally to count how many stitches you have in 4 inches/10 cm. Hold the ruler vertically to count how many rows you have.

Step 6: Compare your results to the intended gauge in the pattern. Adjust your hook as needed.

  • Go UP a hook size if you have more stitches and/or rows per 4 inches/10cm.
  • Go DOWN a hook size if you have less stitches and/or rows.

How to swatch in the round:

When swatching in the round, you’ll need to chain double the amount of stitches than you would for a flat swatch. From our example before of: 12 sts/10 rows, we went with 15 stitches and 12 rows for our swatch to have a little extra for an accurate measurement. So, when working in the round, you’ll need to chain 30, and then join in the round. Then you’d work your same 12 rounds (rather than rows), then block, and measure, and adjust (see above).

Q & A

What if my gauge swatch is too large?

The project will turn out way too big. If it’s an article of clothing, this can make or break whether it fits you, and you ever wear it. Oversized can be great, but only if that’s what you’re going for. Oftentimes if a pattern is supposed to be oversized, it’s already built into your size through what’s called “positive ease”. For example the designer might say the garment has 4-6 inches of positive ease, which means they’ve already added an extra 4-6 inches on top of the standard measurements for your size. *double check their schematic to be sure.

What if my gauge swatch is too small?

In my opinion, this is even worse… you may not be able to even wear your garment, and it won’t be very comfortable.

What if my stitch gauge matches, and only my ROW GAUGE is off?

Check out the golden loop technique to adjust your row gauge without changing hook size. If your stitch gauge is on target, going up or down a hook size isn’t necessary.

OR, if you are making something for yourself, and it’s not a crochet test, (for tests you need to follow the pattern as written) you can simply add or omit extra rows to get to the desired length.

Is there ever a time when gauge doesn’t matter?

Maybe for a scarf or shawl. But I’d still recommend swatching to see if you like the resulting fabric created with the hook size and yarn you’ve chosen. (drape, texture, stiff/flimsy?)

So We Agree… Gauge Swatching is Important, Right?!

When you’re following a pattern, gauge swatching is THE most important step to ensure that it will turn out how you want it to. Swatching tells you if you need to change your hook size from the size the designer used in the pattern. It also tells you how the resulting fabric will look and feel, so you know for sure that you’ll like it.

Swatching is the best way to know if your garment will fit you and look good! So please please please, take the time to do your gauge swatch!

IT’S WORTH IT! So go work it. 😉

Be sure and let me know if you have any questions, or if need me to explain anything in more depth! I’m happy to help.

how to gauge swatch for crochet pattern

Hang out with me on Instagram!

tigerseyehandmade

Customizable crochet patterns to spark your creativity 🌙
Patterns, testing & more👇🏼

2025 was a year of revamping old patterns and prec 2025 was a year of revamping old patterns and precious family time. I’ve so enjoyed slowing down this year and soaking in every moment with my loved ones. ❤️ Hoping to keep this grounded energy going into the new year. Cheers to all that’s to come in 2026! 🥂

#crochet #crochetdesigner
Can’t believe this was from almost a year ago when Can’t believe this was from almost a year ago when I was 4ish months pregnant! 🤯 So much has changed in the last 12 months, and it seems we’re evolving one week to the next with our now 5 month old & her big sis. Their relationship is so fun to watch develop!! 

Soaking it all in. Much like crocheting (and knitting), becoming a mom has taught me to enjoy and focus on the journey and less on the destination. Medicine for my anxiety. ❤️ 

Pattern: cozy v sweater by me!!

Yarn: my most fav floofy goodness @wecrochetofficial wonderfluff 🐑
Just out here trying to ✨slow down✨ after a lifeti Just out here trying to ✨slow down✨ after a lifetime of racing to the next thing, and the next thing. 🫶🏼

Pattern: #CozyVSweater by meee made in one of my all time fav yarns: @wecrochet Wonderfluff 

#CozyCrochet #WeekendVibes
Lessons from a chicken bag: 🐔 1. Count your stitc Lessons from a chicken bag: 🐔

1. Count your stitches after inc or dec rows. I know right… why did I think I could get away with not doing this, *especially* with go for faux!? 🤔
2. Read ahead in the pattern so you don’t go off the rails. I thought I knew what I was doing without checking ahead… I didn’t 🤦🏻‍♀️ which leads me to…
3. Frog as much as you need to until you’re happy!! Otherwise what’s the point?? I’d rather it take longer and me be 100% stoked about my FO!

Thanks chicken bag for reminding me how to yarn good. 👍🏼 

Pattern: #CrochetChickenBag by Caroline Thirling @mymoriko 🐓

I think she needs a name to be in the chicken bag club though… any thoughts?

#Crochet #CrochetChicken
Hey hey, it’s my birthday!! (BIG pattern sale deet Hey hey, it’s my birthday!! (BIG pattern sale deets below) 🎉🎉

Woke up to an earthquake! 🫨 3.2 today… we’ve been having tons of small ones allll month! I’d rather that than a big one! Aannnnddd we have a sick toddler who’s somehow energetic as ever! 🤧🤔

My plans for the day include hopefully finishing my chicken bag (just need to do the strap and button closure!), chasing the toddler around with a tissue, and lots of relaxing! The weather’s cold and rainy… perfect for a movie!! 🎥🍿 

Also celebrating with a big ole bday sale to thank you for your support! Use the code: BDAY40 for 40% off alllll patterns on Ravelry, Etsy, or my site! Check my stories to teleport over & find a pattern for this cozy season!! 💕💕

#Crochet #FallCrochet #CrochetPatternSale
Love love LOVE my Superstitious Pullover🤍🐈‍⬛🕸️ 🤌🏼😘 Love love LOVE my Superstitious Pullover🤍🐈‍⬛🕸️ 🤌🏼😘 to the designer @michaelshauun for the fun mix and match charts, every version I’ve seen is totally unique! 

#knitsweater #halloweenknits #superstitiouspullover
Snuggly sweater season is upon us— huzzah! =^o^= Snuggly sweater season is upon us— huzzah! =^o^= 

This fall pullover features the cutest cat face motif made with stranded colorwork. It’s purrfect for adventurous beginners with just 2 colors, easy peasy!

The main stitch used is the central single crochet (aka the waistcoat stitch) which can be a lil funky until you find your rhythm…

✨ My biggest tip: keep your hands relaxed so the center of your stitches aren’t too tight to work into. 

I let my working yarn hang between my fingers without wrapping it to keep the tension consistent, but not tight. 

🐾 Have you done the central single crochet/waistcoat stitch before?? Do you like it? 

Pattern: #PurrfectPullover by meee 🐱 Available on Ravelry, Etsy & my website.

#crochetcatsweater #crochetsweaterpattern #fallcrochet
Round yoke sweaters are my fav to design & make. 🫶 Round yoke sweaters are my fav to design & make. 🫶🏼 It’s so nice to be able to try on as you go for fit-checks! 

Just gotta watch out for that blocking growth when using certain types of yarn. For example—superwash merino wool with nylon in the blend! 

If you’re worried about getting the yoke length right and don’t want extra fabric at the underarm, try a light steam block when you’re about to split for the body & sleeves. This will give you a feel for how much the length will grow & you can add or subtract rows as needed. 

Or if you’re like me & don’t mind more of a “wing-it methodology” make your yoke chains hit slightly snug at the underarm and let the magic of wet blocking your FO do its thang. 🪄✨ I do this with most yarn blends EXCEPT 100% acrylic since that doesn’t grow. 

Pro tip- do your gauge swatch and measure both before & after blocking to get an idea of how much your chosen yarn will grow. Just know that your finished sweater will stretch even more than your swatch due to the weight and size!! 

Pattern: #WinterBelle2.0 by me ❤️

Yarn: 100% SW Merino, dyed by 🙋🏻‍♀️

#CrochetSweater #FallCrochet #BellSleeves
Sweet with a little sass. 💃🏻 Introducing Belle 2. Sweet with a little sass. 💃🏻

Introducing Belle 2.0… an update to the original pattern that released 2020. The biggest improvement is in the shaping—a better fit throughout with options to highlight your curves. Go for a streamlined or more relaxed fit. Make it your own!!

The Winter Belle 2.0 is LIVE— head over to my Ravelry, Etsy or my website to get started on your next sweater now!

#CrochetSweaterPattern #CrochetPattern #WinterBelleSweater
Follow on Instagram

Category: Tips and Tricks

Related Posts

You may be interested in these posts from the same category.
how to fix row gauge

Crochet Gauge: How to Adjust Row Height with the Golden Loop

how to choose the right yarn

How To Choose The Best Yarn For A Crochet Garment

how to block crochet

How To Block Crochet Garments & Why It’s Important

tips for making crochet garments that fit

My 3 Best Tips for Making Crochet Garments that Fit

seaming crochet pieces

My Favorite Tip for Seaming Crochet Garments

Previous Post: «how to choose the right yarn How To Choose The Best Yarn For A Crochet Garment
Next Post: Crocheters & Knitters: Try this easy move to take care of your shoulders… no equipment needed! shoulder pain from crocheting»

Primary Sidebar

About Me

Hello fellow maker! I'm Tina Marie, the crochet designer behind Tigers Eye Handmade. Here you'll find both free and paid crochet patterns, as well as helpful tips. Welcome to my blog!

Categories

  • Crochet Design Process
  • Crochet Patterns
  • Growing a Business
  • Maker Self Care
  • Tips and Tricks
  • Maker Self Care
  • Crochet Design Process
  • Crochet Patterns
  • Growing a Business

Site Footer

  • Disclaimer
  • Website Terms of Use
  • Privacy Policy

Copyright © 2026 · Mai Lifestyle Pro on Genesis Framework · WordPress · Log in

  • Facebook
  • Twitter
  • Pinterest