

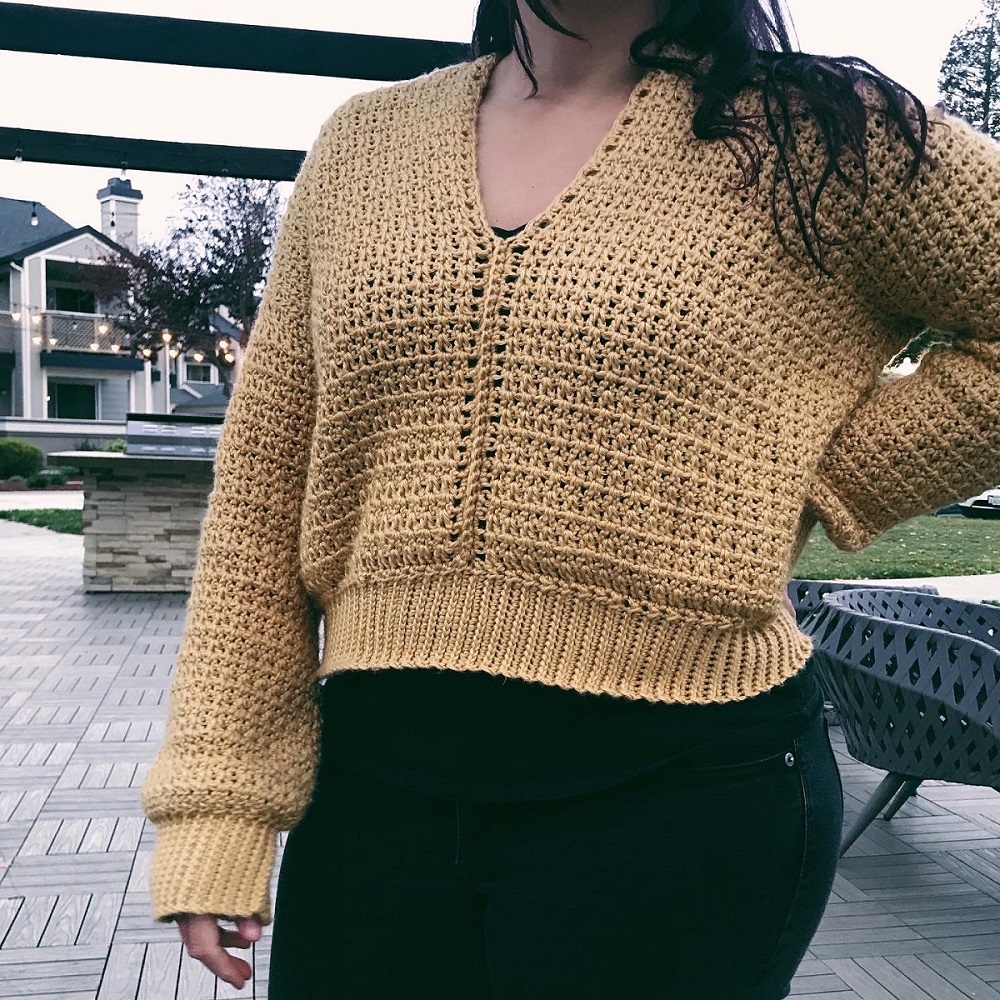
Wanna learn how to make a crochet pullover so cozy you could live in it?!
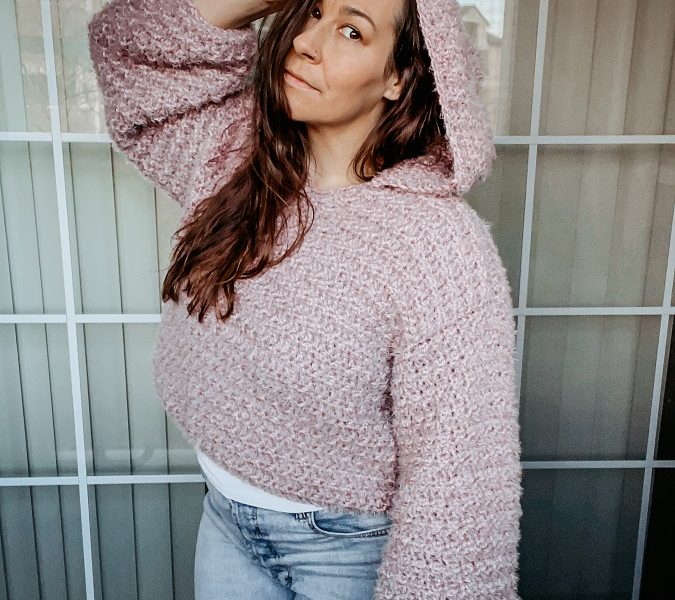
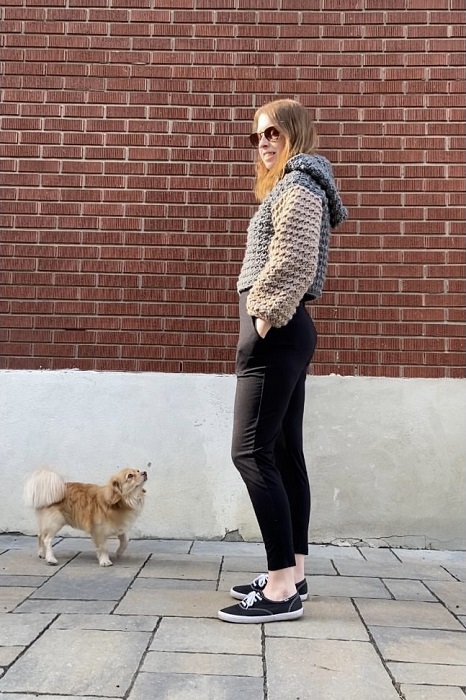
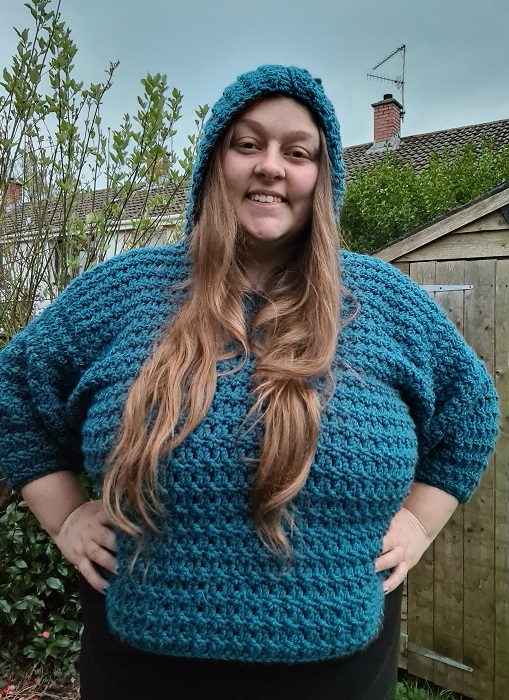
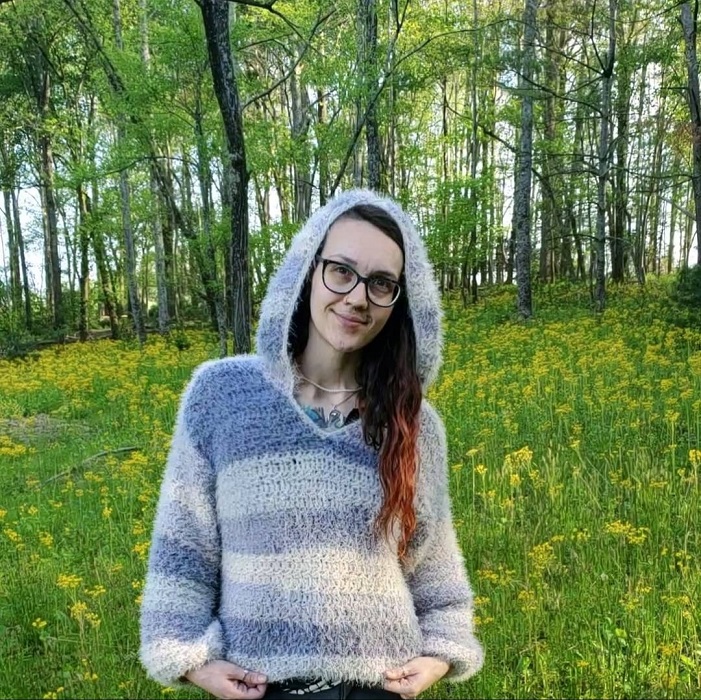
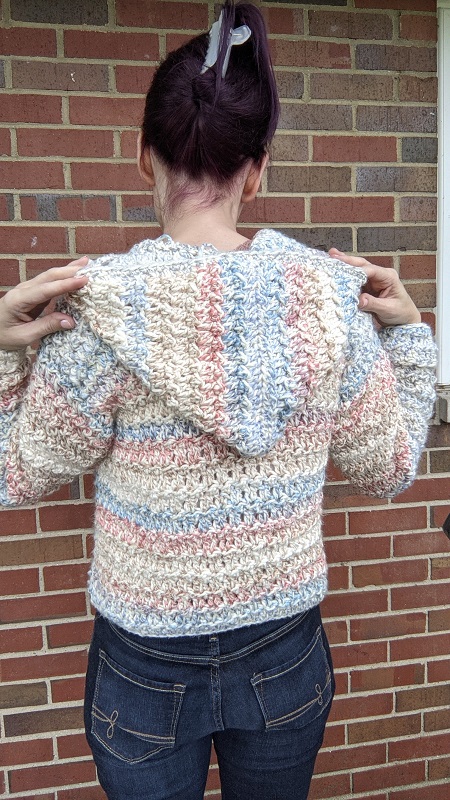
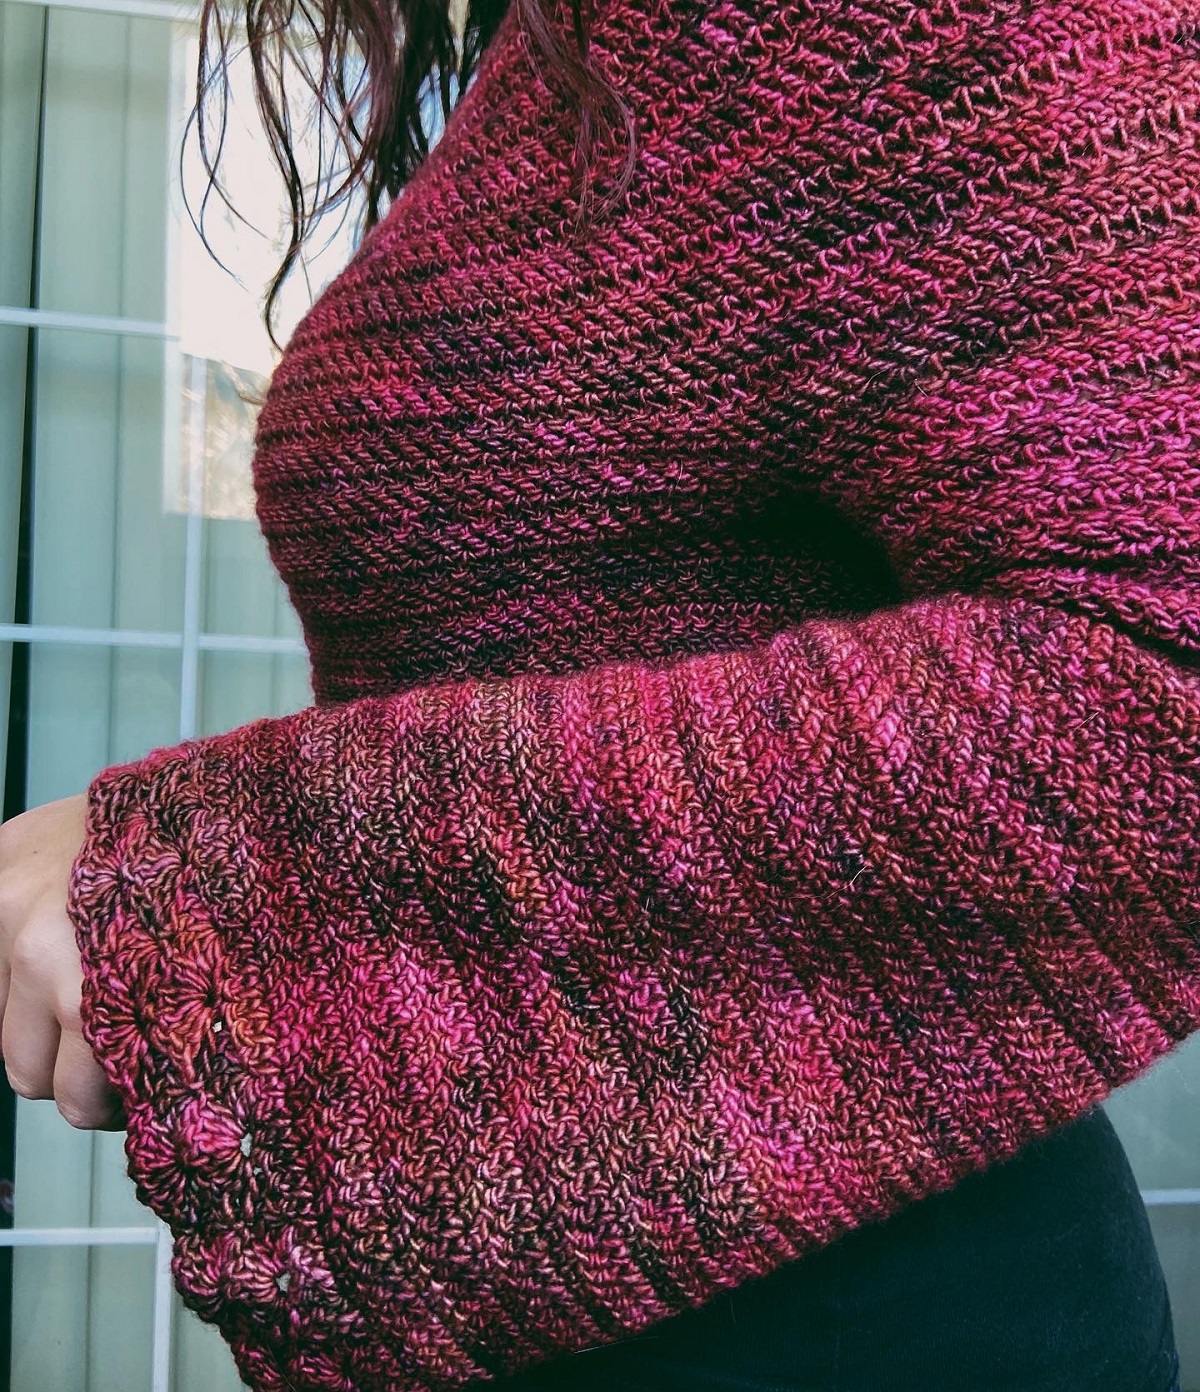
This free crochet hoodie pattern goes by the name, “Floofster Hoodie”! It’s a crochet v-neck sweater with balloon sleeves and a customizable hood. This floofy lil thang has 3-5 inches of positive ease for an oversized, comfy-as-heck fit.
The Floofster Hoodie is a versatile pullover—perfect to cozy up in for an evening crafting & relaxing on the couch while listening to your favorite podcast/book, OR you can dress it up for a date night out. I’ve done both, and it’s quickly become a wardrobe fav!
Keep on reading for the free pattern (with ads). The pattern includes step by step instructions and photo tutorials.
Purchase the ad-free Hoodie Pattern pdf HERE.
RECOMMENDED YARN
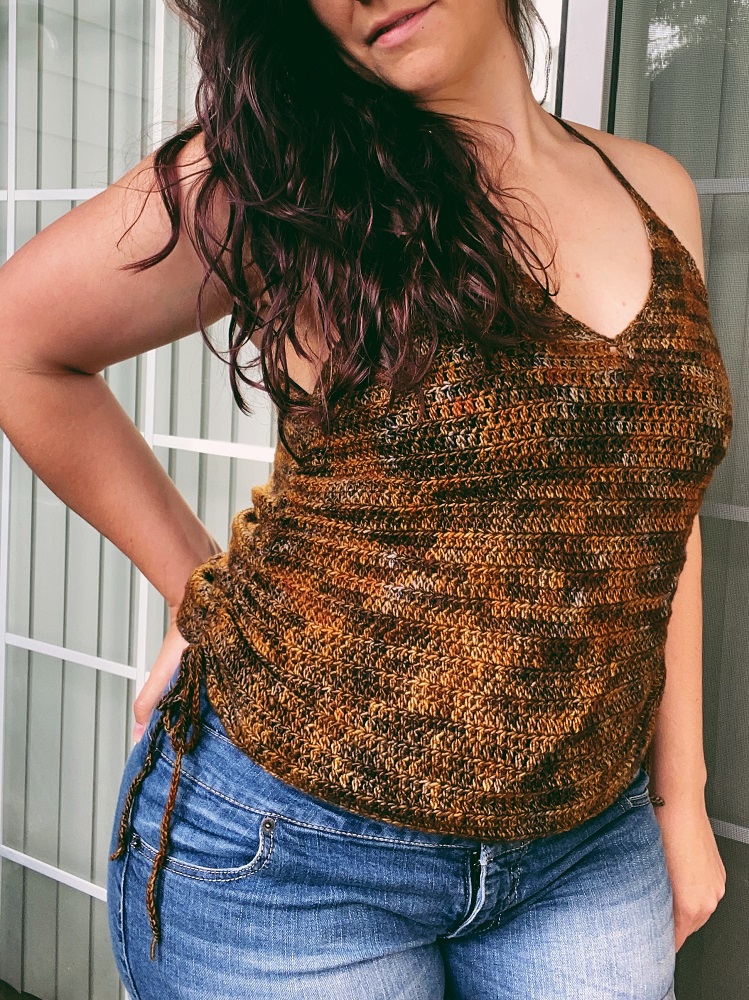
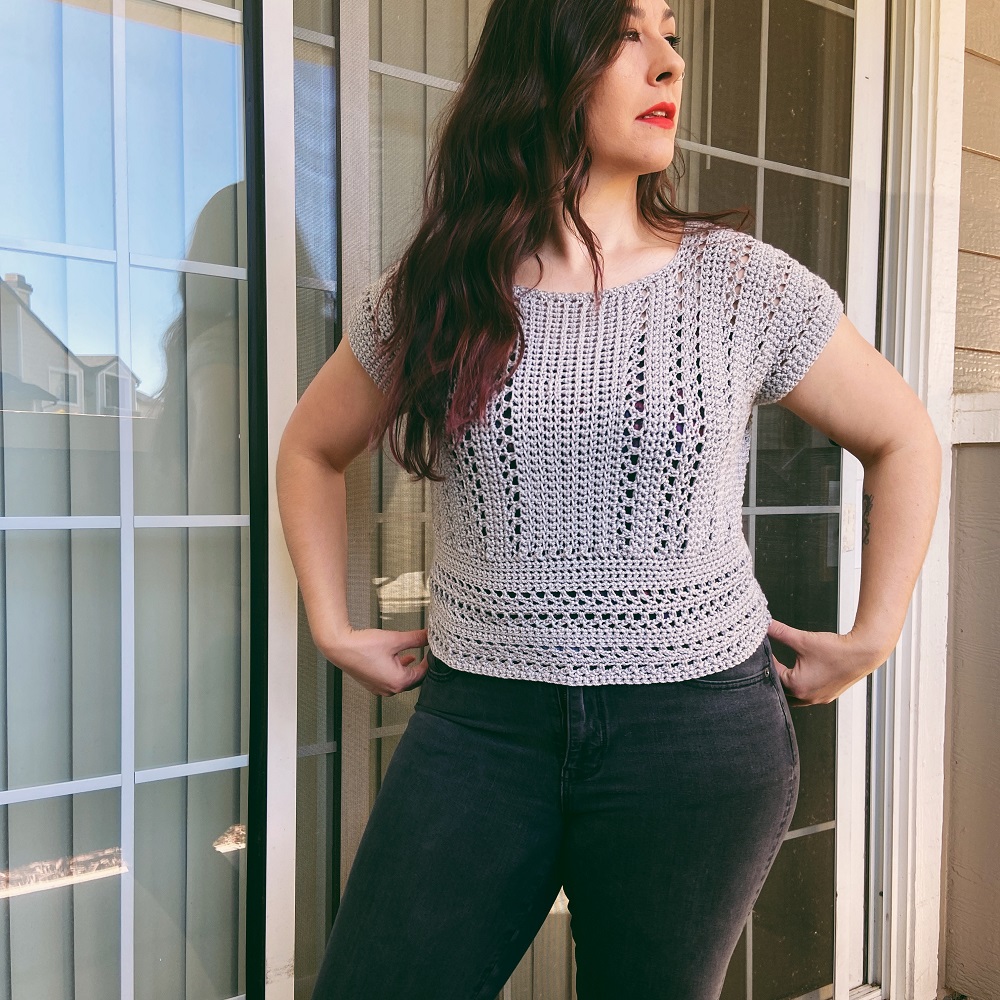
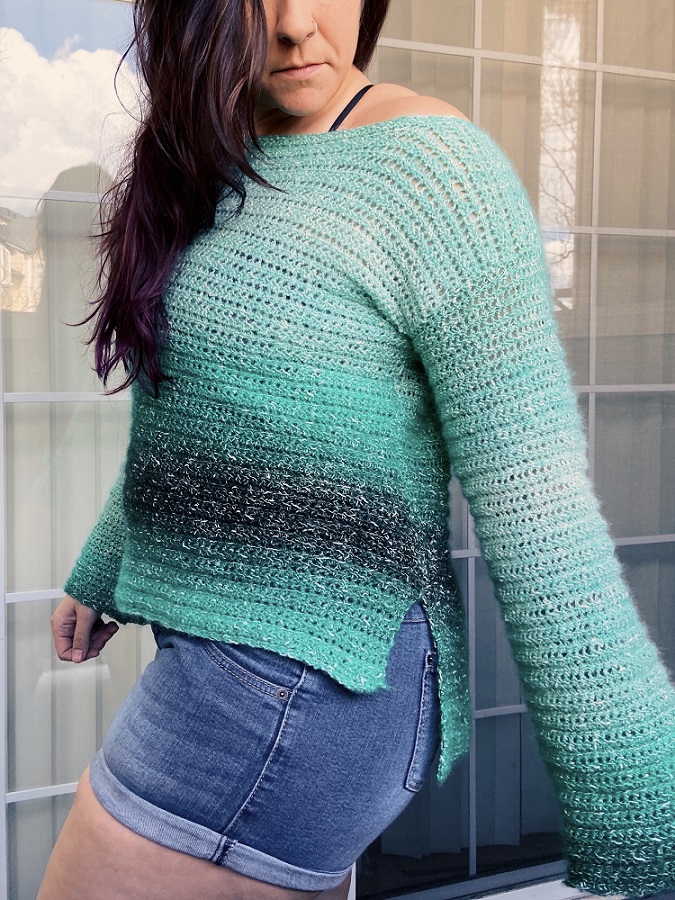
This textured hoodie works up in a jiffy with bulky weight yarn. I used Red Heart Hygge for mine, as did a few of the testers. Other popular choices were Caron Latte Cakes, and Bernat Velvet.
You can check out photos of the testers below to learn what yarn they chose and get some ideas. Any bulky weight that you love the feel of and meets gauge will do!
DETAILS
This crochet hoodie pattern uses simple crochet stitches. All you need to know to complete this pattern are: how to: foundation chain, slip stitch, single crochet, double crochet, double crochet two together decrease, slip stitch two together decrease, and seam.
CONSTRUCTION
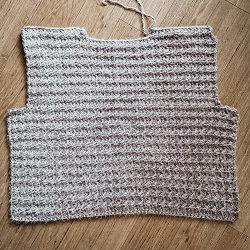
The Floofster Hoodie is made in two panels with armhole and neckline shaping. After seaming the shoulders and sides of the panels together, the rest of the sweater is made as one piece.
Yarn is attached to create the hood. There’s 3 different hood sizes to choose from so you can get the look you like. Then yarn is attached at the armhole to create the balloon sleeves in the round, so you can make sure the length is perfect for you.
SIZING
I wanted to make sure that this hoodie is size inclusive and cozy as can be for ALL. The pattern includes written instructions for 9 different sizes: XS – 5X following the Craft Yarn Council Standards.
Sizes XS–3X have been tested. Sizes 4X & 5X have not, but of course I am more than happy to provide pattern support to you if you will be making one of those sizes! Sometimes it can be tricky to find testers for all sizes, even with ample testing time.
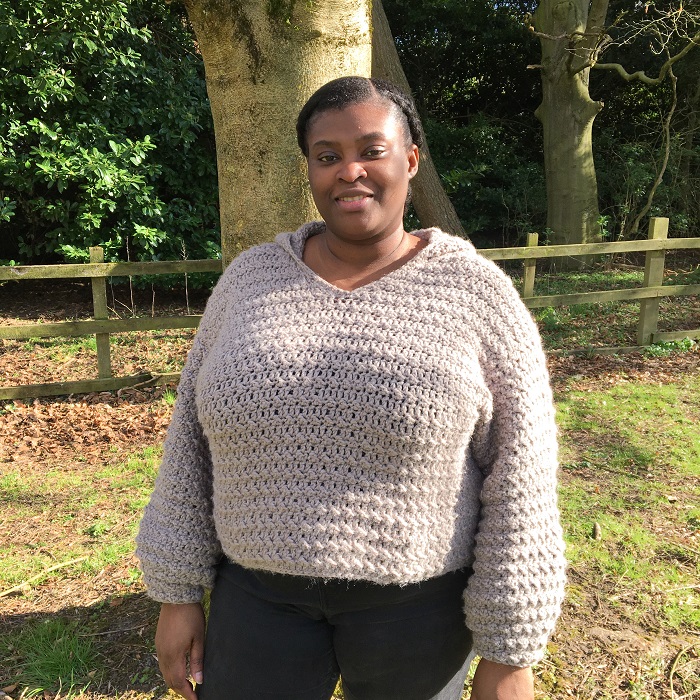
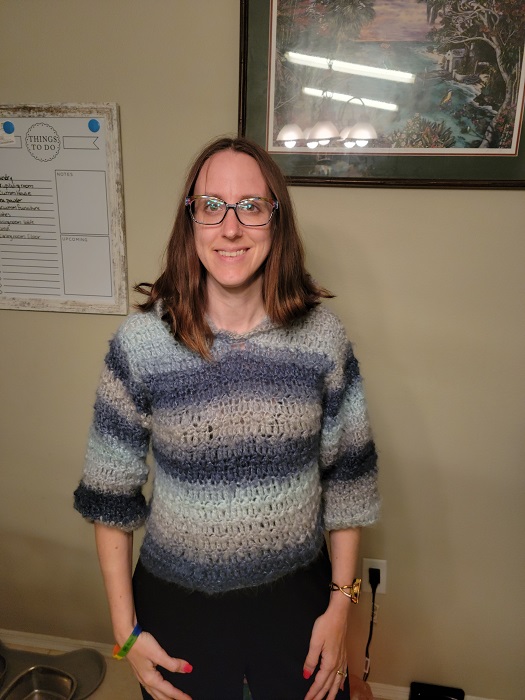
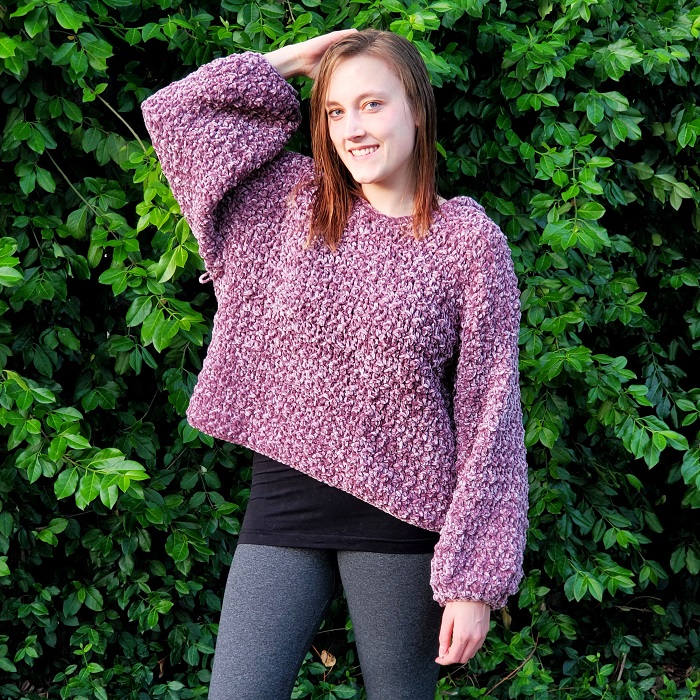
Check out the Floofster Hoodie Testers!
Loops and Threads Charisma

@justtheworsted
Himalaya Everyday Big

Caron Latte Cakes

Caron Latte Cakes
James C Brett Chunky with Merino
Caron Latte Cakes in earl grey
Stylecraft Softie Chunky
Bernat Plentiful
Bernat Velvet

Red Heart Hygge

James C. Brett Flutterby Chunky, Shade Deep Rose
We Love Yarn Bulky
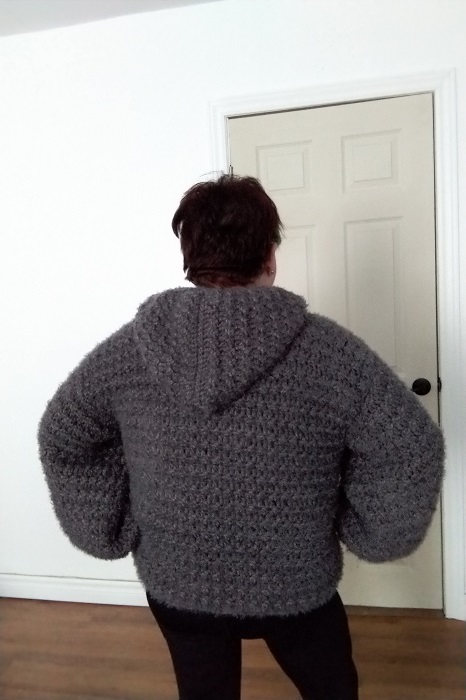
Red Heart Hygge
Yarn Bee Arabella in Whimsical Whirlwind

Moda vera chunky plush

Red Heart Hygge
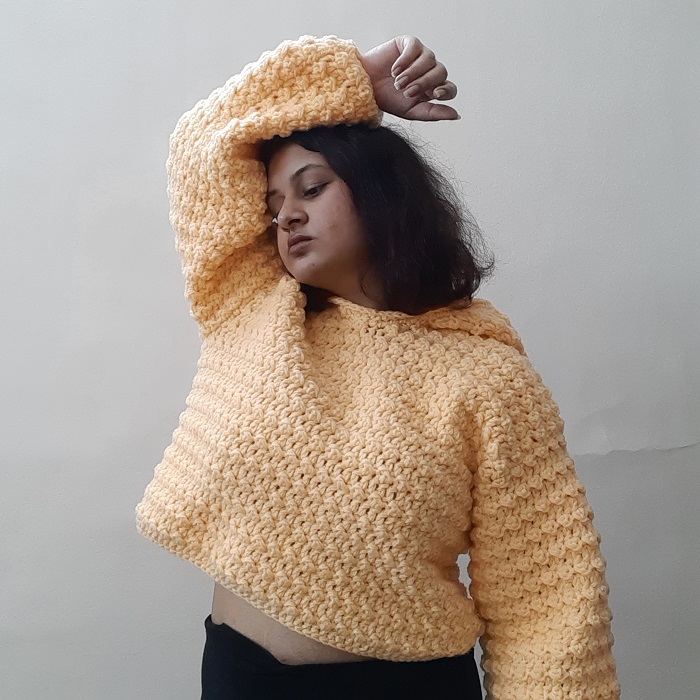
8 PLY Double Knit Acrylic Yarn (Shade No.8 BUTTER); 2 skeins held together

King Cole Big Value Chunky in blue heaven
You can purchase the AD-FREE Floofster Hoodie Crochet Pattern in my Pattern Shop, on Ravelry, or Etsy.
Materials Needed:
Yarn: (5) Bulky Weight Yarn- Sample made in Red Heart Hygge
Hook: 7 mm
Tapestry Needle
Scissors
removable stitch markers
Skill Level:
Advanced Beginner
Sizes:
XS (S, M, L, XL) ((2X, 3X, 4X, 5X))
Schematic:
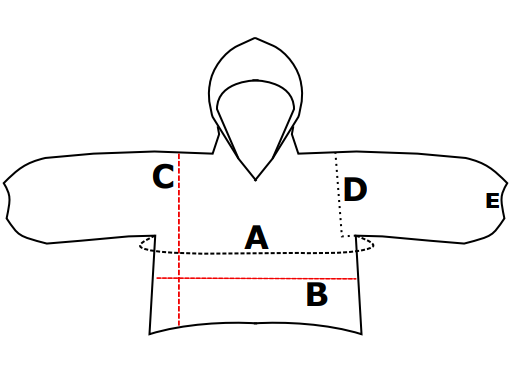
Note: The approximate finished dimensions are below. This hoodie is intended to be made with 3-5” of positive ease. There are 3 hood sizes included, yardage is based off of the largest size.
| Sizes | Finished Bust (A) | Panel Width (B) | Panel Length (C) | Armhole (D) | Wrist Circ. (E) | Estimated Yardage |
| XS (28-30”) | 33.5” | 16.75” | 15.6” | 7.5” | 8.7” | 955 y |
| S (32-34”) | 37.8” | 18.9” | 15.6” | 7.5” | 8.7” | 970 y |
| M (36-38”) | 40.7” | 20.3” | 16.4” | 8.5” | 8.7” | 1050 y |
| L (40-42”) | 45” | 22.5” | 18.2” | 9.5” | 8.7” | 1195 y |
| XL (44-46”) | 49.5” | 24.8” | 20” | 10.5” | 8.7” | 1385 y |
| 2X (48-50”) | 53.8” | 26.9” | 20.9” | 11.5” | 8.7” | 1539 y |
| 3X (52-54”) | 58.2” | 29.1” | 22.7” | 12.5” | 8.7” | 1641 y |
| 4X (56-58”) | 61.1” | 30.6” | 23.6” | 13.5” | 8.7” | 1768 y |
| 5X (60-62”) | 65.5” | 32.8” | 23.6” | 13.5” | 8.7” | 1843 y |
Gauge:
11 sts & 8 rows = 4 x 4 inches
Texture Pattern Swatch Instructions:
Extra sts and rows are added for a more accurate measurement.
R1: foundation dc 12 sts, ch 1 & turn. (12)
R2(WS): dc in first st, ss in next st, (dc in next st, ss in next st) across, ch 1 & turn. (12)
R3: dc in each st across, ch 1 & turn. (12)
Repeat R2-3 until you have 9 rows.
Techniques & Abbreviations (U.S. terms):
approx- approximately
ch- chain
dc- double crochet
dc2tog- double crochet two together
PM- place marker
rs- right side
sc- single crochet
sc2tog- single crochet two together
SM(s)- stitch marker(s)
ss- slip stitch
ss2tog- slip stitch two together
st(s)- stitch(es)
ws- wrong side
Pattern Notes:
- This sweater is made in two panels that are seamed together along the shoulders and sides. Then the hood and sleeves are added. For the sleeves, yarn is attached at the underarm, and the sleeves are worked in the round. The hood is worked in back and forth rows, and seamed together along the top to make the top of the hood.
- Textured pattern is always worked on the wrong side.
- The chain 1 at the beginning of RS rounds does NOT count as a stitch, meaning the first stitch of the round will be worked in the same space as the chain
- The row count resets at certain points within the pattern for better readability. (armhole shaping & v neck shaping)
- I recommend highlighting your size and sections to make the pattern easier to follow.
PATTERN INSTRUCTIONS
FRONT PANEL
All Sizes:
R1: foundation dc 46(52, 56, 62, 68)((74, 80, 84, 90)) sts, ch 1 & turn.
R2(WS): dc in first st, ss in next st, (dc in next st, ss in next st) across, ch 1 & turn. 46(52, 56, 62, 68)((74, 80, 84, 90))
R3: dc in each st across, ch 1 & turn.
Repeat R2-3 until you have 20(20, 20, 22, 22) (22, 24, 24, 24) total rows.
*If you would like to add length extra rows may be added here.
Armhole Shaping:
R1: ss in the next 3(3, 4, 5, 6)((6, 7, 7, 7)) sts, ch 1 & dc in each st across until there are 3(3, 4, 5, 6)((6, 7, 7, 7)) sts left leaving them unworked. ch 1 & turn. 40(46, 48, 52, 56)((62, 66, 70, 76))
Sizes XS, S, L, 3X, 4X, 5X:
R2: ss in first st, dc in next st, (ss in next st, dc in next st) across, ch 1 & turn.
R3: dc in each st across, ch 1 & turn.
Repeat R2-3 until you have 7(7, -, 9, -)((-, 13, 13, 13)) rows from the armhole.
Sizes M, XL, 2X:
R2: dc in first st, ss in next st, (dc in next st, ss in next st) across, ch 1 & turn.
R3: dc in each st across, ch 1 & turn.
Repeat R2-3 until you have -(-, 9, -, 9)((11, -, -, -)) rows from the armhole.
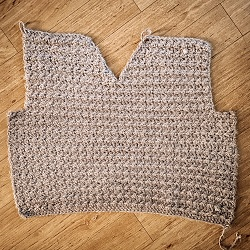
Front Panel V Neck Shaping:
-First Side-
Sizes XS, L, 5X:
R1 (WS): ss in first st, dc in next st, (ss in next st, dc in next st) until you have 20(-, -, 26, -)((-, -, -, 38)) total sts, ch 1 & turn.
R2: dc2tog, dc in each st across, ch 1 & turn. 19(-, -, 25, -)((-, -, -, 37))
R3: ss in first st, (dc in next st, ss in next st) across until you have 2 sts left, dc2tog, ch 1 & turn.
Repeat R2-3 until you have 15(-, -, 19, -)((-, -, -, 27)) rows from the armhole and 13(-, -, 17, -)((-, -, -, 25)) sts left. Fasten off.
Sizes S, 3X, 4X:
R1 (WS): ss in first st, dc in next st, (ss in next st, dc in next st) until you have -(23, -, -, -)((-, 33, 35, -)) total sts, ch 1 & turn.
R2: dc2tog, dc in each st across, ch 1 & turn. -(22, -, -, -)((-, 32, 34, -))
R3: ss in first st, dc in next st, (ss in next st, dc in next st) across until you have 2 sts left, ss2tog, ch 1 & turn.
Repeat R2-3 until you have -(15, -, -, -)((-, 25, 27, -)) rows from the armhole and -(16, -, -, -)((-, 22, 22, -)) sts left. Fasten off.
Sizes M, XL:
R1 (WS): dc in first st, ss in next st, (dc in next st, ss in next st) until you have -(-, 24, -, 28)((-, -, -, -)) total sts, ch 1 & turn.
R2: dc2tog, dc in each st across, ch 1 & turn. -(-, 23, -, 27)((-, -, -, -))
R3: dc in first st, (ss in next st, dc in next st) across until you have 2 sts left, ss2tog, ch 1 & turn.
Repeat R2-3 until you have -(-, 17, -, 21)((-, -, -, -)) rows from the armhole and -(-, 17, -, 17)((20, -, -, -)) sts left. Fasten off.
Sizes 2X:
R1 (WS): dc in first st, ss in next st, (dc in next st, ss in next st) until you have -(-, -, -, -)((31, -, -, -)) total sts, ch 1 & turn.
R2: dc2tog, dc in each st across, ch 1 & turn. -(-, -, -, -)((30, -, -, -))
R3: dc in first st, ss in next st, (dc in next st, ss in next st) across until you have 2 sts left, dc2tog, ch 1 & turn.
Repeat R2-3 until you have -(-, -, -, -)((23, -, -, -)) rows from the armhole and -(-, -, -, -)((20, -, -, -)) sts left. Fasten off.
-Second Side-
Attach yarn to WS in the center of the panel in the st next to the first side of the bottom of the v neck and ch 1. your first st will be worked in the same space as ch.
Sizes XS, L, 5X:
R1 (WS): ss in first st, dc in next st, (ss in next st, dc in next st) until you have 20(-, -, 26, -)((-, -, -, 38)) total sts, ch 1 & turn.
R2: dc in each st across until two sts remain, dc2tog, ch 1 & turn. 19(-, -, 25, -)((-, -, -, 37))
R3: dc2tog, (ss in next st, dc in next st) across, ch 1 & turn.
Repeat R2-3 until you have 15(-, -, 19, -)((-, -, -, 27)) rows from the armhole and 13(-, -, 17, -)((-, -, -, 25)) sts left. Fasten off.
Sizes S, 2X, 3X, 4X:
R1 (WS): dc in first st, ss in next st, (dc in next st, ss in next st) until you have -(23, -, -, -)((31, 33, 35, -)) total sts, ch 1 & turn.
R2: dc in each st across until two sts remain, dc2tog, ch 1 & turn. -(22, -, -, -)((30, 32, 34, -))
R3: ss2tog, (dc in next st, ss in next st) across, ch 1 & turn.
Repeat R2-3 until you have -(15, -, -, -)((23, 25, 27, -))rows from the armhole and -(16, -, -, -)((20, 22, 22, -)) sts left. Fasten off.
Sizes M, XL:
R1 (WS): dc in first st, ss in next st, (dc in next st, ss in next st) until you have -(-, 24, -, 28)((-, -, -, -)) total sts, ch 1 & turn.
R2: dc in each st across until two sts remain, dc2tog, ch 1 & turn. -(-, 23, -, 27)((-, -, -, -))
R3: ss2tog, dc in next st (ss in next st, dc in next st) across, ch 1 & turn.
Repeat R2-3 until you have -(-, 17, -, 21)((-, -, -, -))rows from the armhole and -(16, 17, -, 17)((20, 22, 22, -)) sts left. Fasten off.
BACK PANEL
All Sizes:
R1: foundation dc 46(52, 56, 62, 68)((74, 80, 84, 90)) sts, ch 1 & turn.
R2(WS): dc in first st, ss in next st, (dc in next st, ss in next st) across, ch 1 & turn. 46(52, 56, 62, 68)((74, 80, 84, 90))
R3: dc in each st across, ch 1 & turn.
Repeat R2-3 until you have 20(20, 20, 22, 22) ((22, 24, 24, 24)) total rows.
*If you would like to add length extra rows may be added here. Match the row count from your front panel.
Armhole Shaping:
R1: ss in the next 3(3, 4, 5, 6)((6, 7, 7, 7)) sts, ch 1 & dc in the next st and in each st across until there are 3(3, 4, 5, 6)((6, 7, 7, 7)) sts left. ch 1 & turn. 40(46, 48, 52, 56)((62, 66, 70, 76))
Sizes XS, S, L, 3X, 4X, 5X:
R2: ss in first st, dc in next st, (ss in next st, dc in next st) across, ch 1 & turn.
R3: dc in each st across, ch 1 & turn.
Repeat R2-3 until you have 13(13, -, 17, -)((-, 23, 25, 25)) rows from the armhole.
Sizes M, XL, 2X:
R2: dc in first st, ss in next st, (dc in next st, ss in next st) across, ch 1 & turn.
R3: dc in each st across, ch 1 & turn.
Repeat R2-3 until you have -(-, 15, -, 19)((21, -, -, -)) rows from the armhole.
Back Panel Neckline Shaping:
-First Side-
Sizes XS, S, L, 3X, 4X, 5X:
(WS) R14(14, -, 18, -)((-, 24, 26, 26)): ss in first st, dc in next st, (ss in next st, dc in next st) until you have 13(16, -, 17, -)((-, 22, 22, 25)) total sts, ch 1 & turn.
Sizes M, XL, 2X:
(WS) R-(-, 16, -, 20)((22, -, -, -)): dc in first st, ss in next st, (dc in next st, ss in next st) until you have -(-, 17, -, 17)((20, -, -, -)) total sts, ch 1 & turn.
All Sizes:
R15(15, 17, 19, 21)((23, 25, 27, 27)): dc in each st across. Fasten off. 13(16, 17, 17, 17)((20, 22, 22, 25)) sts
-Second Side-
(WS) Attach yarn 13(16, 17, 17, 17)((20, 22, 22, 25)) sts in from the left edge. ch 1 & working into the same space as the ch, repeat the same steps as the first side of the back panel -except sizes XS, M, L, XL, 5X: start with dc to ensure texture rows line up.. Fasten off. 13(16, 17, 17, 17)((20, 22, 22, 25)) sts
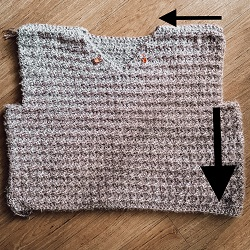
Seaming:
Seam the Front Panel and the Back Panel Together first along the shoulders, then down each side from the underarm down to the bottom hem. I used a whip stitch for good reinforcement, since the bulky yarn can be a bit heavy. The whip stitch should be done with the sweater “inside out” (WS facing you).
Hood:
There are instructions for three different size hoods: 1, 2, 3.
Size 1 is approx 20” wide x 13” tall
Size 2 is approx 22” wide x 14.5” tall
Size 3 is approx 24” wide x 16” tall
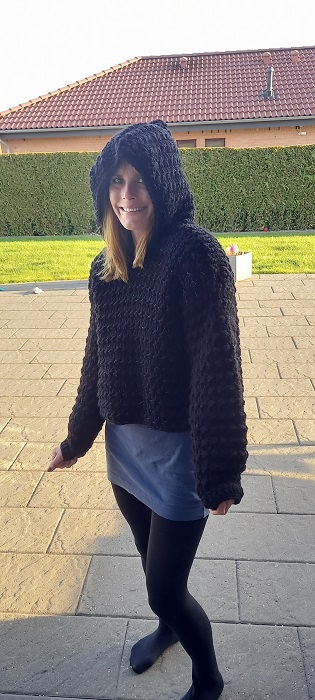
For my hoodie, I went with the largest size (Size 3) because I wanted a giant hood. You might experiment here and see what you like/what works with your hoodie.
You will need 2 SMs. PMs on each side of the V, between 2 – 4 inches below the shoulder seam, measured diagonally from the shoulder seam down along the V neck. Below the markers, you should have at least 2 – 3 inches of space measured diagonally to the bottom of the V. If you’d like your V neck more pronounced, PMs a bit on the higher side of the range, closer to the shoulder seam. Be sure the SMs are even and match up from one side to the other.

Attach yarn at the right side SM (as when wearing).
R1(RS): ch 1 & sc up the first side of the V, around the back of the neckline, and down the front of the V to the left side SM. You may want to add a SM at the middle of the back side neckline to mark the halfway point. This way you can divide your total st count in half to help you space the sts evenly. Shoot for approx 41(41, 43, 43, 45)((47, 47, 47, 47)) sc all the way around from the first SM to the second. This st count doesn’t have to be exact, just be sure you end on an odd #. ch 1 and turn.
R2 (WS): ch 1 & ss in the first st, (dc in the next st, ss in the next st) around, ch 1 & turn.
R3: 2dc in the first st, dc in the next st and in each st across until there’s one st left, 2dc in the last st, ch 1 & turn.
Size 1: repeat R2-3 until you have 57 total sts. Then continue in pattern without increasing until your hood is 13” tall (approx 25 rows) & fasten off.
Size 2: repeat R2-3 until you have 61 total sts. Then continue in pattern without increasing until your hood is 14.5” tall (approx 29 rows) & fasten off.
Size 3: repeat R2-3 until you have 67 total sts. Then continue in pattern without increasing until your hood is 16” tall (approx 31 rows) & fasten off.

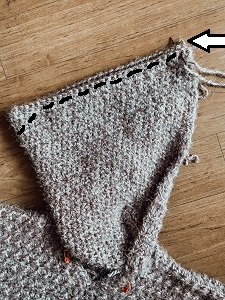
Fold the hood in half, inside out & seam from the opening at the front to the back. I seamed with a whip stitch and made the back of the hood about 1” lower than the actual edge to reduce the appearance of a “point.” (see right side picture for visual)
Hoodie Finishing:
Here you will be making 2 rows of sc around the V neck and opening of the hoodie.

R1(RS):Attach yarn at the center of the V neck (center arrow) and sc up the first side of the V, around the hood, and down the second side of the V. Place around with the spacing of your sc to see what works for you. For my Size 3 hood, I placed 1 sc at the end of each row for the hood section to slightly cinch the opening. For the v neck section, I placed 2 sc in the edge of every dc row, and 1 sc in the end of texture rows.
R2(RS): ss to the first sc, then complete a second row of sc, ss to the first st, and fasten off.
Sleeves:
Here you will attach yarn at the underarm and work the sleeves in the round. Each round will turn, texture pattern is worked on the WS.
How to Close the Round: Tip- mark the first st of the round, so when you come back around it’s easy to spot. The top two photos show a circle around the last completed st of the round (top left is the WS- texture round, top right is the RS- dc round). It looks like there could be one more st, but that is the st below the ch 1, do not dc there. You should always end a texture round with a ss. The bottom photo shows the ss to the marked first dc. The Hygge was very difficult to see, so this is shown on a different yarn.

R1 (RS): attach yarn at the center of the underarm. ch 1 & evenly space 40(42, 46, 52, 58)((64, 68, 72, 72)) sc around the armhole. Be sure half the total sts are on either side of the front and back panel. I used the shoulder seam to mark my half way point. ss to the first sc. ch 1 & turn.
R2(WS): dc in the first st, ss in the next st (dc in the next st, ss in the next st) around. ss to the first dc. ch 1 & turn.
R3: dc in each st around. ss to the first dc. ch 1 & turn.
Repeat R2-3 until your sleeve is approx 1(2, 2, 3, 3)((4, 4, 4, 4)) inches shorter than your desired total length ending on a WS row.
Balloon Sleeve Decrease Rounds:
All sleeves decrease to a wrist circumference of 8.7”. If you’d like to decrease more, I’d recommend placing additional decreases to the last dec row to maintain the balloon shape. If you’d like to decrease less, omit decreases from the first dec row.
Sizes XS:
R1: (dc in the next 3 sts, dc2tog) around, ss to the first dc. ch 1 & turn. (32 sts)
R2(WS): dc in the first st, ss in the next st (dc in the next st, ss in the next st) around. ss to the first dc. ch 1 & turn.
R3: (sc in the next 2 sts, sc2tog) around, ss to the first sc, ch 1 do not turn. (24 sts)
R4: ss in each st around, ss to the first st & fasten off.
Size S:
R1: (dc in the next 4 sts, dc2tog) around, ss to the first dc. ch 1 & turn. (35 dc)
R2(WS): dc in the first st, ss in the next st (dc in the next st, ss in the next st) around. ss to the first dc. ch 1 & turn.
R3: (dc in the next 3 sts, dc2tog) around, ss to the first dc, ch 1 do not turn. (28 dc)
R4: repeat R2
R5: (sc in the next 2 sts, sc2tog) around, ss to the first sc, ch 1 do not turn. (24 sc)
R6: ss in each st around, ss to the first st & fasten off.
Size M:
R1: dc in the first st and each st around *evenly spread out six decreases (dc2tog), ss to the first dc. ch 1 & turn. It does not divide evenly so just decrease every 5th st or so. Just be sure to only decrease six total times. (40 dc)
R2(WS): dc in the first st, ss in the next st (dc in the next st, ss in the next st) around. ss to the first dc. ch 1 & turn.
R3: (dc in the next 2 sts, dc2tog) around, ss to the first dc, ch 1 & turn. (30 dc)
R4(WS): repeat R2
R5: (sc in the next 3 sts, sc2tog) around, ss to the first sc, ch 1 do not turn. (24 sc)
R6: ss in each st around, ss to the first st & fasten off.
Size L:
R1: dc2tog, dc in the next st and each st around until there are two sts left, dc2tog, ss to the first dc. ch 1 & turn. (50 dc)
R2(WS): dc in the first st, ss in the next st (dc in the next st, ss in the next st) around. ss to the first dc. ch 1 & turn.
R3: (dc in the next 3 sts, dc2tog) around, ss to the first dc, ch 1 & turn. (40 dc)
R4(WS): repeat R2
R5: (dc in the next 2 sts, dc2tog) around, ss to the first dc, ch 1 & turn.
(30 dc)
R6(WS): repeat R2
R7: (sc in the next 3 sts, sc2tog) around, ss to the first sc, ch 1 & do not turn. (24 sc)
R8(RS): ss in each st around, ss to the first st & fasten off.
Size XL:
R1: dc in the first st and each st around *evenly spread out eight decreases (dc2tog), ss to the first dc. ch 1 & turn. It does not divide evenly so just decrease every 6th st or so. Just be sure you only decrease eight total times. (50 dc)
R2(WS): dc in the first st, ss in the next st (dc in the next st, ss in the next st) around. ss to the first dc. ch 1 & turn.
R3: (dc in the next 3 sts, dc2tog) around, ss to the first dc, ch 1 & turn. (40 dc)
R4(WS): repeat R2
R5: (dc in the next 2 sts, dc2tog) around, ss to the first dc, ch 1 & turn.
(30 dc)
R6(WS): repeat R2
R7: (sc in the next 3 sts, sc2tog) around, ss to the first sc, ch 1 & do not turn. (24 sc)
R8(RS): ss in each st around, ss to the first st & fasten off.
Size 2X:
R1: (dc in the next 14 sts, dc2tog) around, ss to the first dc. ch 1 & turn. (60 dc)
R2(WS): dc in the first st, ss in the next st (dc in the next st, ss in the next st) around. ss to the first dc. ch 1 & turn.
R3: (dc in the next 4 sts, dc2tog) around, ss to the first dc, ch 1 & turn. (50 dc)
R4(WS): repeat R2
R5: (dc in the next 3 sts, dc2tog) around, ss to the first dc, ch 1 & turn.
(40 dc)
R6(WS): repeat R2
R7: (dc in the next 2 sts, dc2tog) around, ss to the first dc, ch 1 & turn.
(30 dc)
R8: repeat R2
R9: (sc in the next 3 sts, sc2tog) around, ss to the first sc, ch 1 & do not turn. (24 sc)
R10(RS): ss in each st around, ss to the first st & fasten off.
Sizes 3X:
R1: dc in the first st and each st around *evenly spread out eight decreases (dc2tog), ss to the first dc. ch 1 & turn. It does not divide evenly so just decrease every 6th st or so. Just be sure you only decrease eight total times. (60 dc)
R2(WS): dc in the first st, ss in the next st (dc in the next st, ss in the next st) around. ss to the first dc. ch 1 & turn.
R3: (dc in the next 4 sts, dc2tog) around, ss to the first dc, ch 1 & turn. (50 dc)
R4(WS): repeat R2
R5: (dc in the next 3 sts, dc2tog) around, ss to the first dc, ch 1 & turn.
(40 dc)
R6(WS): repeat R2
R7: (dc in the next 2 sts, dc2tog) around, ss to the first dc, ch 1 & turn.
(30 dc)
R8: repeat R2
R9: (sc in the next 3 sts, sc2tog) around, ss to the first sc, ch 1 & do not turn. (24 sc)
R10(RS): ss in each st around, ss to the first st & fasten off.
Size 4X & 5X:
R1: (dc in the next 4 sts, dc2tog) around, ss to the first dc. ch 1 & turn. (60 dc)
R2(WS): dc in the first st, ss in the next st (dc in the next st, ss in the next st) around. ss to the first dc. ch 1 & turn.
R3: (dc in the next 4 sts, dc2tog) around, ss to the first dc, ch 1 & turn. (50 dc)
R4(WS): repeat R2
R5: (dc in the next 3 sts, dc2tog) around, ss to the first dc, ch 1 & turn.
(40 dc)
R6(WS): repeat R2
R7: (dc in the next 2 sts, dc2tog) around, ss to the first dc, ch 1 & turn.
(30 dc)
R8: repeat R2
R9: (sc in the next 3 sts, sc2tog) around, ss to the first sc, ch 1 & do not turn. (24 sc)
R10(RS): ss in each st around, ss to the first st & fasten off.
Repeat all steps for the second side sleeve.
Finishing:
Finally weave in any ends, block as needed, and enjoy relaxing in your cozy Floofster Hoodie!!
I hope that you have enjoyed following this crochet pattern! If you have any questions along the way, don’t hesitate to contact me via email at tigerseyehandmade@gmail.com
I’d love to see YOUR finished hoodie! If you post it on IG please tag me @tigerseyehandmade & use the hashtag #FloofsterHoodie to share it with our amazing crafting community!
Hang out with me on Instagram


You can find more free Tigers Eye Handmade Crochet Patterns here!


 My 3 Best Tips for Making Crochet Garments that Fit