
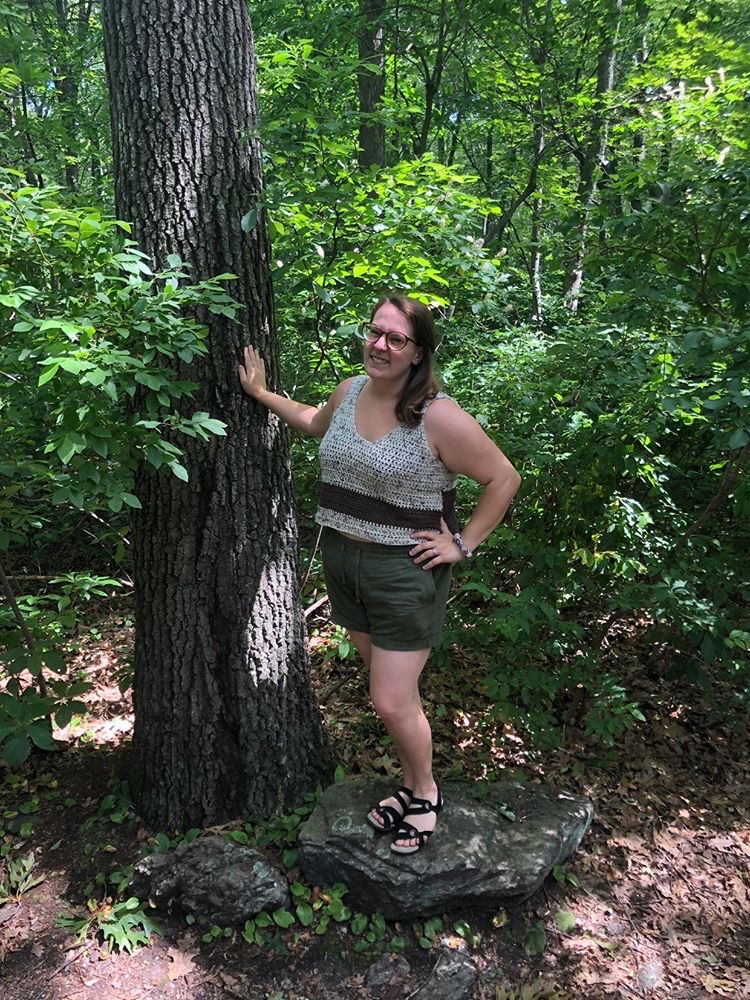
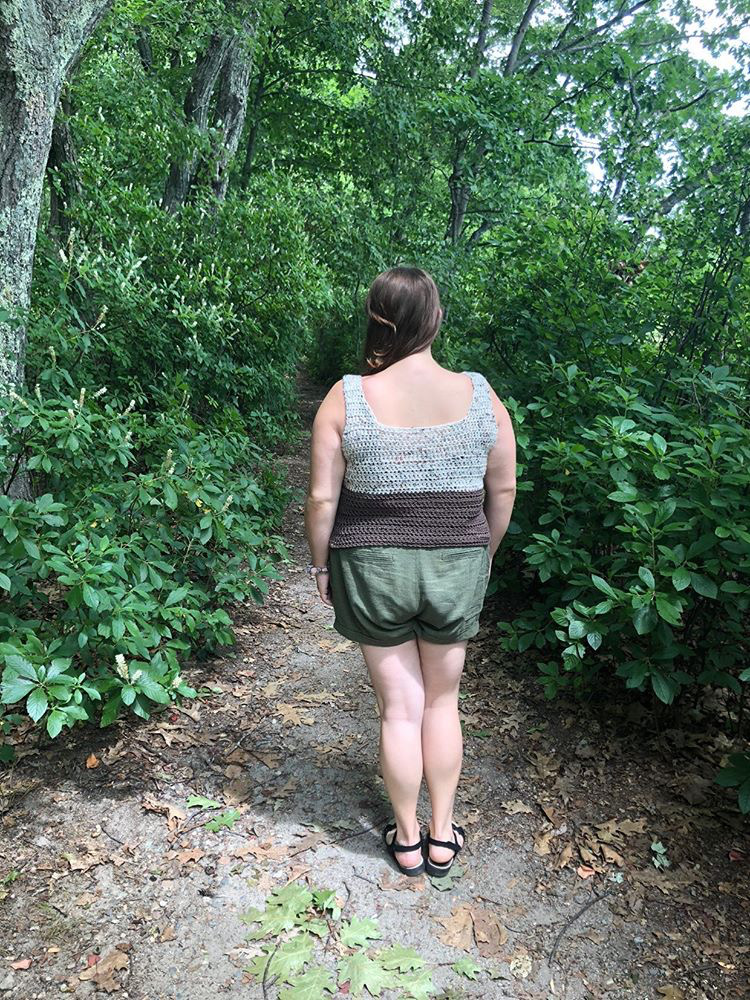
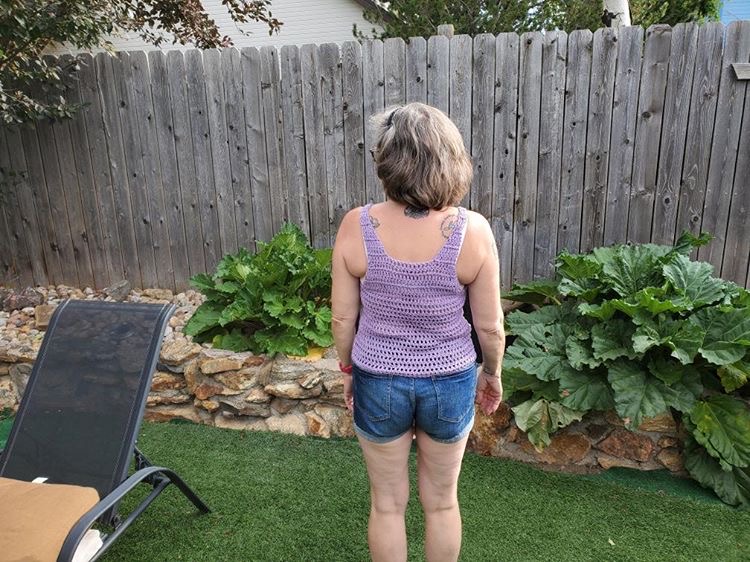
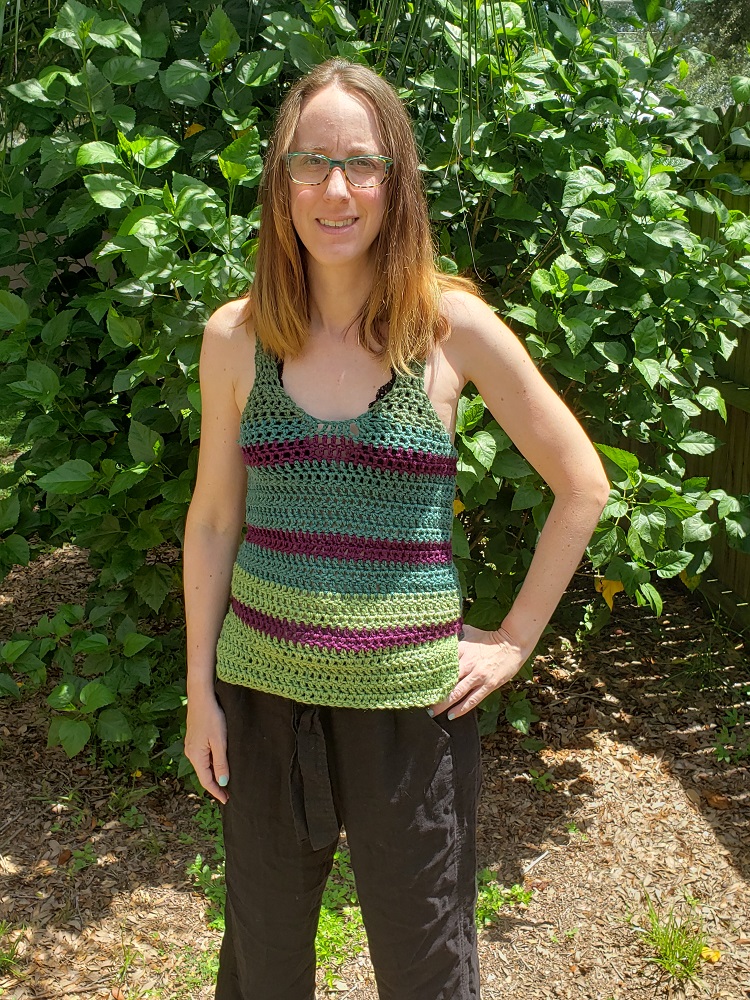
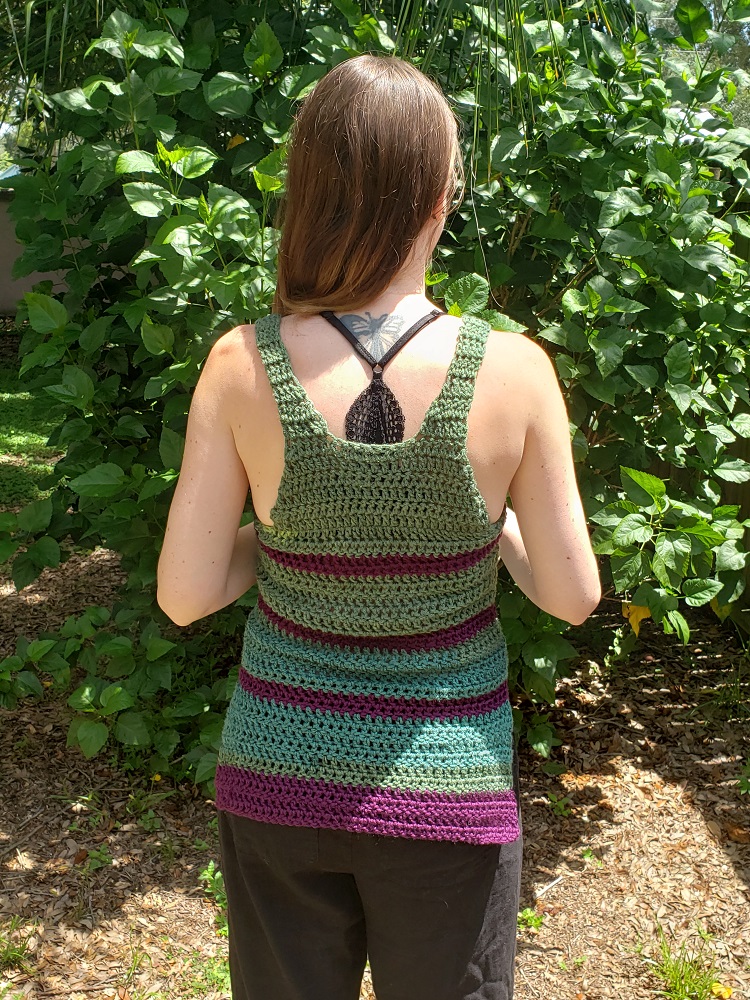
Have you been looking for a scrappy crochet tank top pattern that works with a wide variety of yarn?? Something where you could use up any leftover yarn scraps that need a project, and let them shine? Well, you’ve come to the right place! Keep on reading for a free crochet tank top pattern!
My goal with this pattern was to create a tank top that would fit anyone—just the way they like. A tank with infinite possibilities for both color and sizing. And thus, the idea was born for the Find Your Beat Tank!
Disclosure: some of the links in this post are affiliate links and if you go through them to make a purchase I will earn a small commission at no additional cost to you.
Construction
Find Your Beat is a basic tank shape that is super comfortable and wearable. It is always nice to be able to try things on as you make them. This helps ensure that you love the fit. It also allows you to easily make adjustments as you go rather than having to frog WAYYYYY back. Trying to figure out how to make that try-on-as-you-go construction work for this tank shape took a bit of engineering and a lot of trial and error! Luckily it whips up super fast. After a few tries, it worked out fantastically!
The tank is made top-down in one piece, in back and forth rows. This allows you to put the tank on and see if you like the length of the straps, the bust shaping and fit, and the length of the front and back panel. The only seaming that needs to be done is down the sides. You can add a split hem or seam it all the way down.
The pattern has instructions for a high-low AND for a cropped version. But the customization doesn’t stop there– you can easily modify the length of the front and back panels or make the sizing to any finished dimensions you want with the Custom Sizing Instructions included in the pattern!
Yarn & Color
Find Your Beat Tank is all about expressing yourself creatively. Choose as many or as few colors as you like! Create your own color pattern or just wing-it.
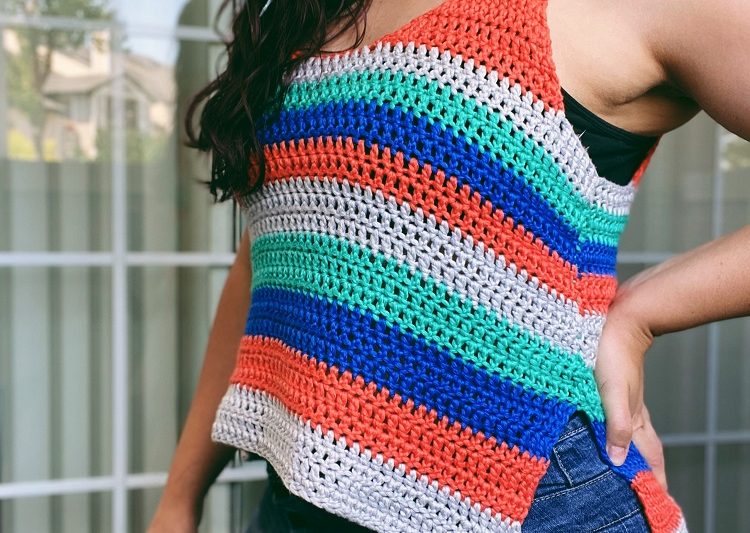
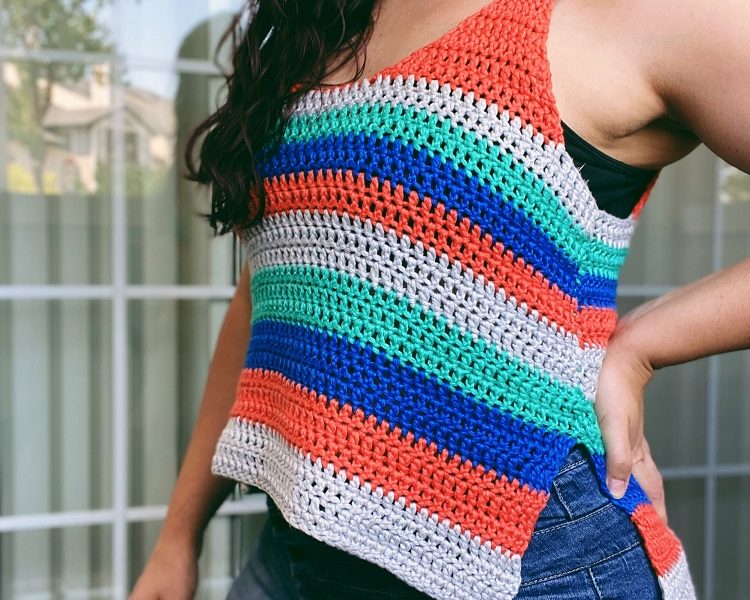
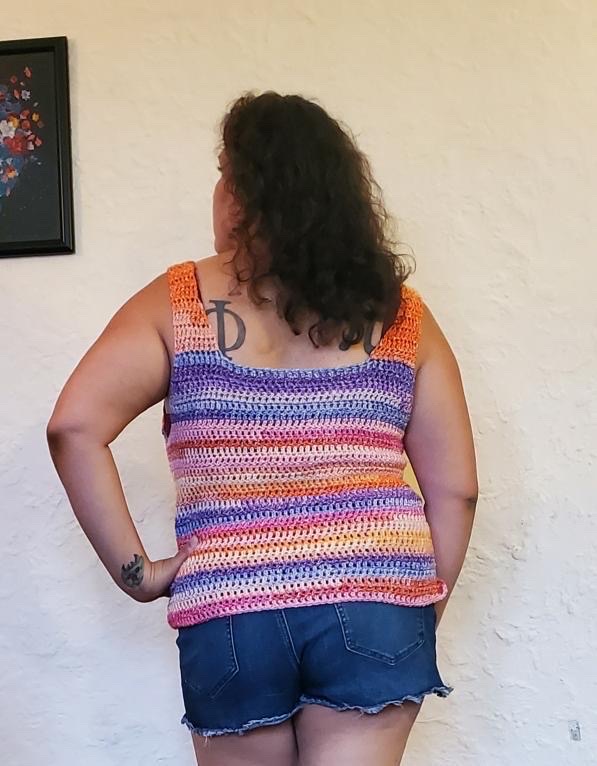
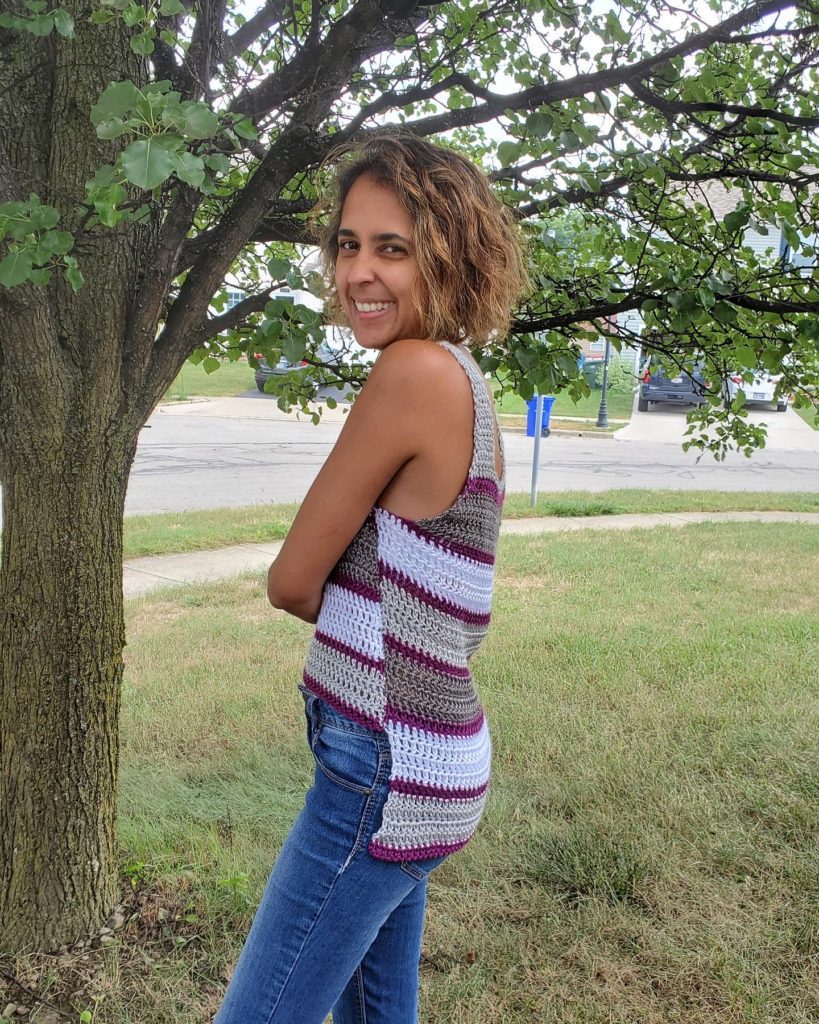
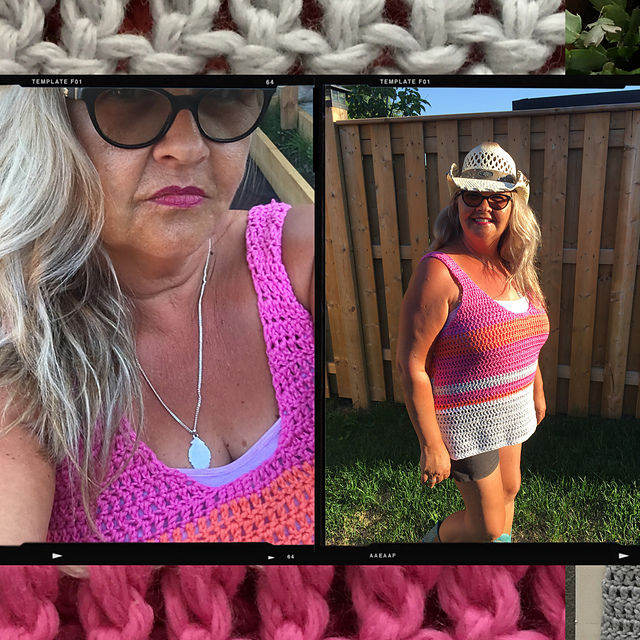
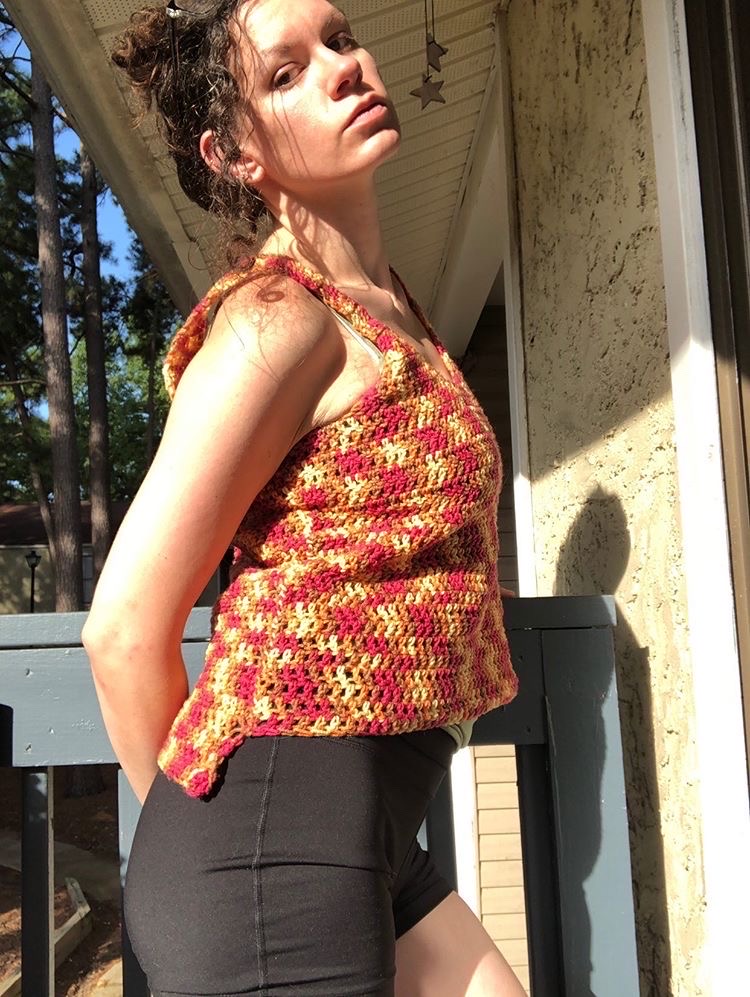
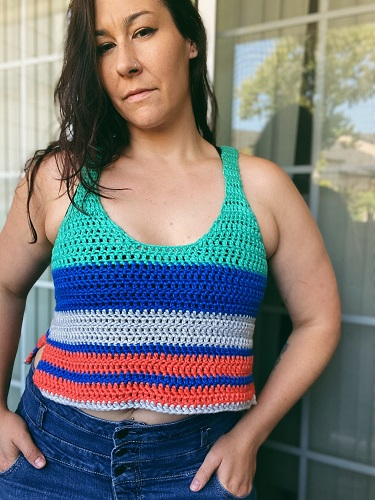
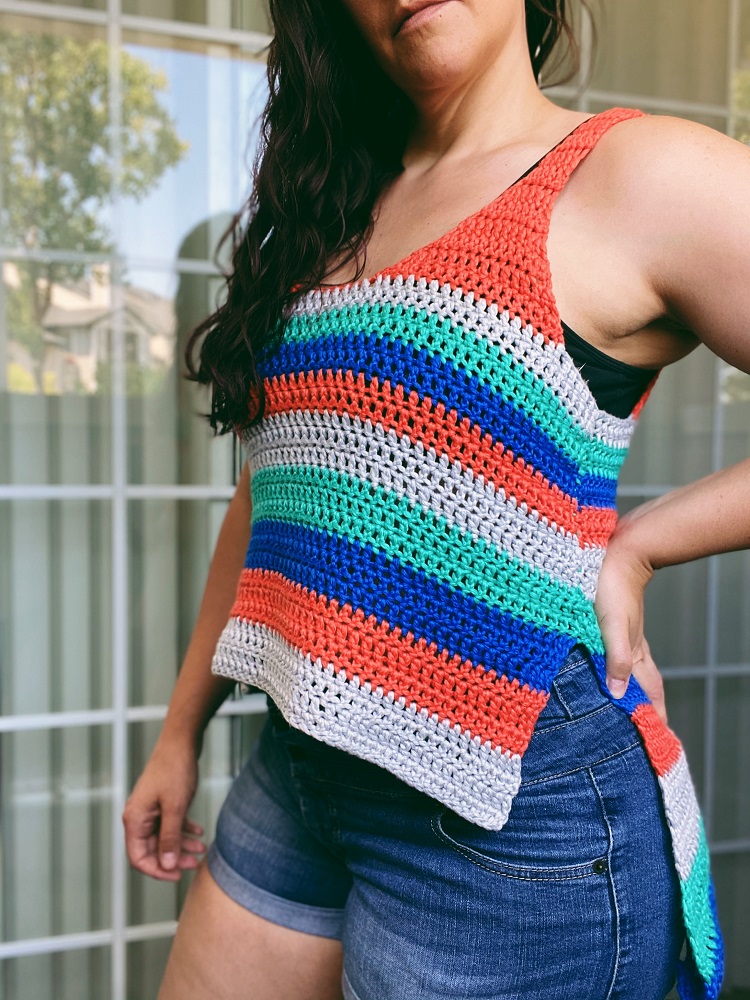
You can use any worsted weight yarn, try a dk, or hold fingering double. Get scrappy! For mine, I used Lion Brand Mako Cotton in 4 different colors that I alternated with varying amounts of rows.
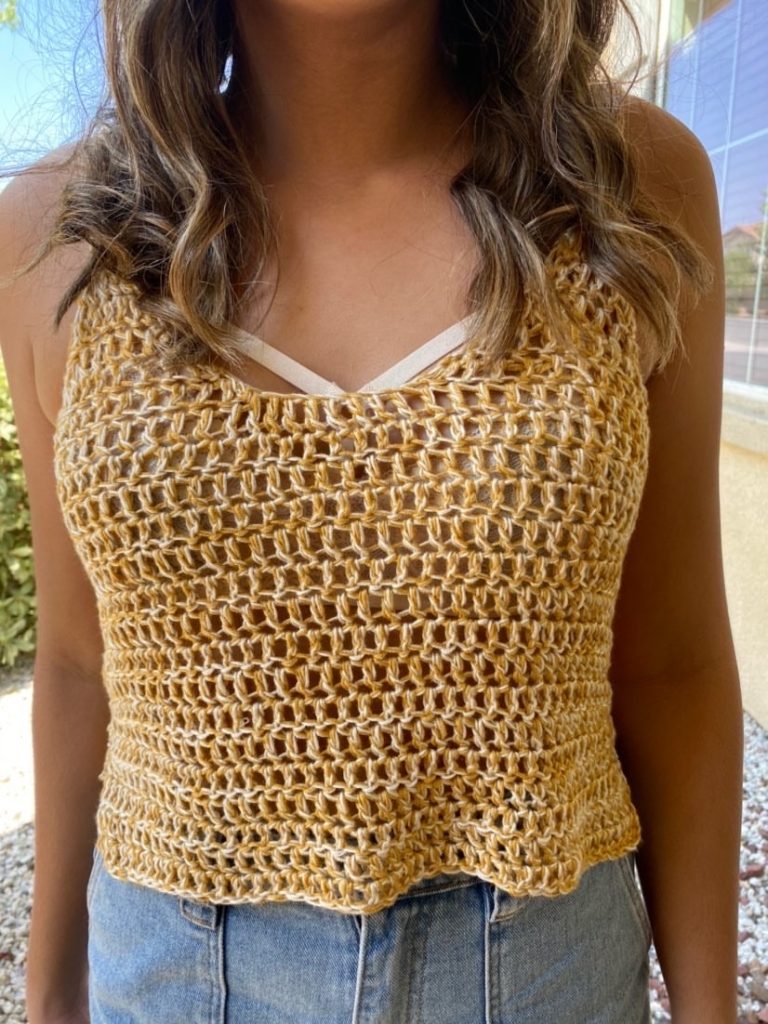
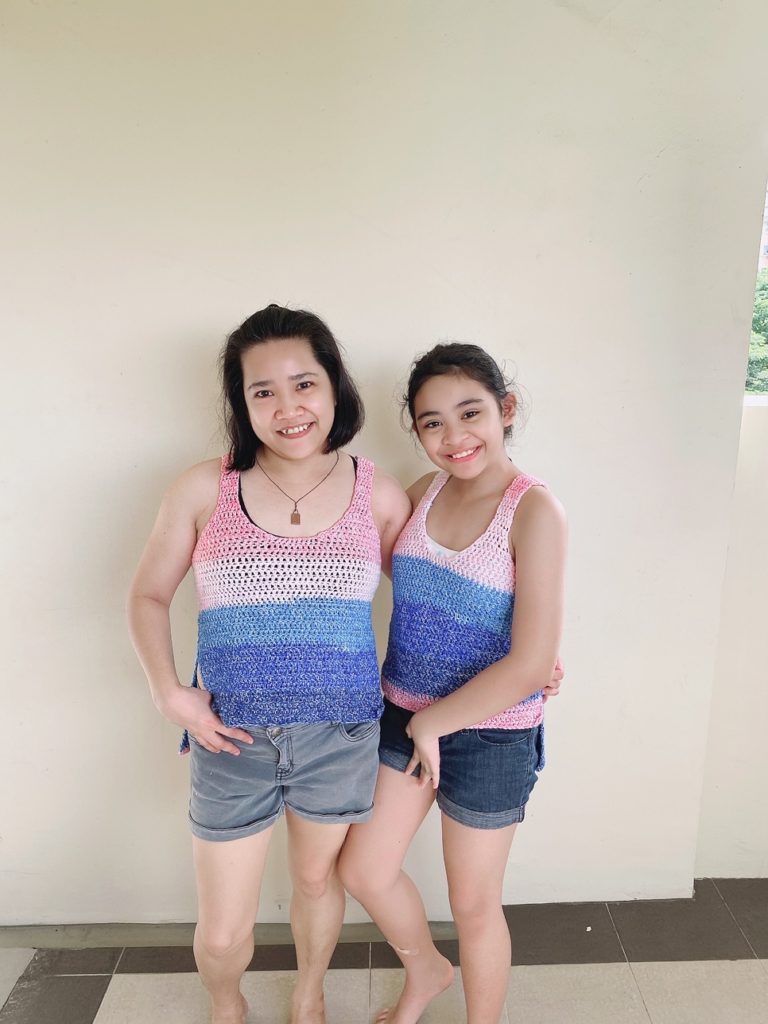
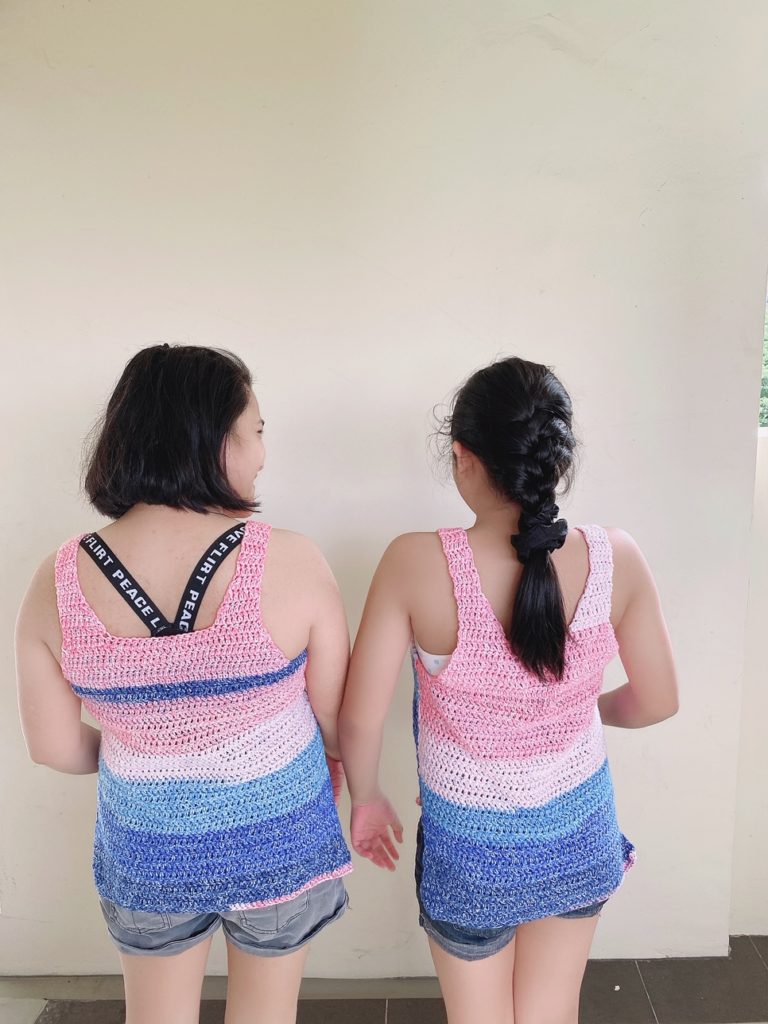
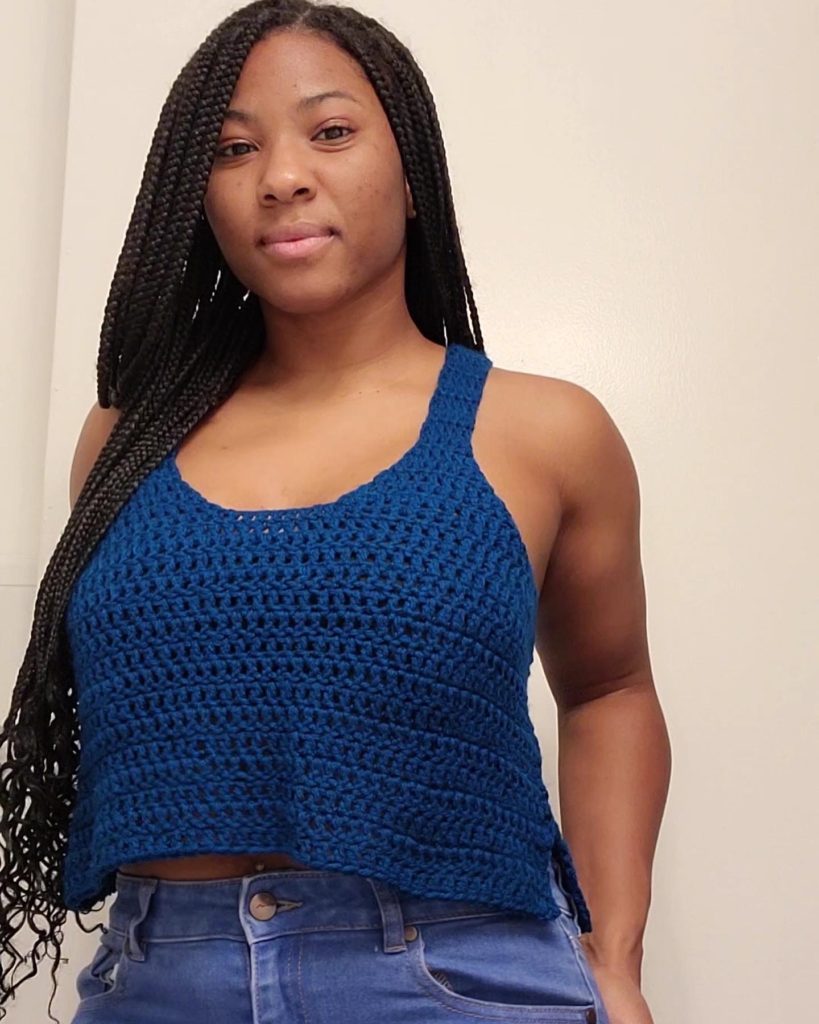
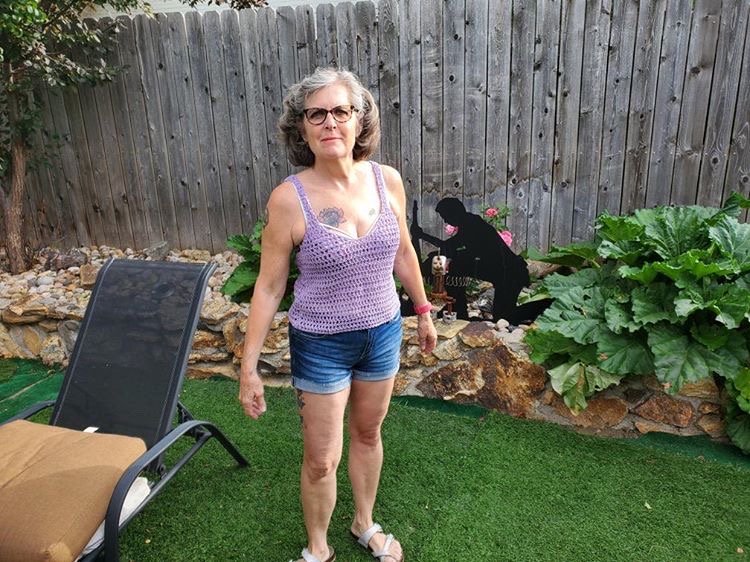
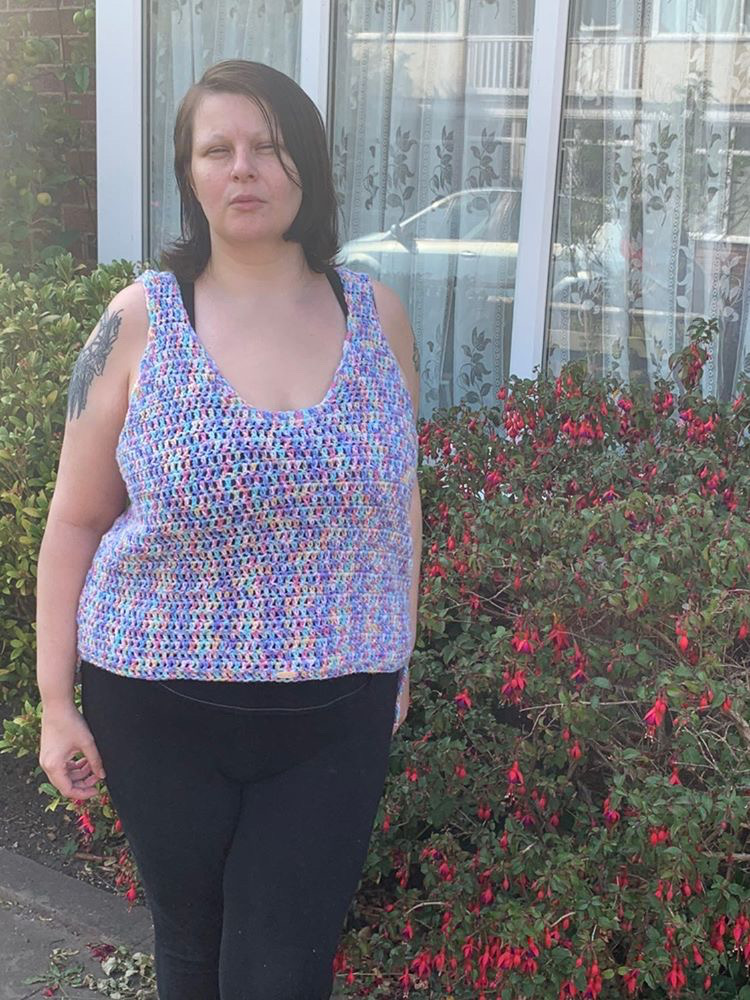
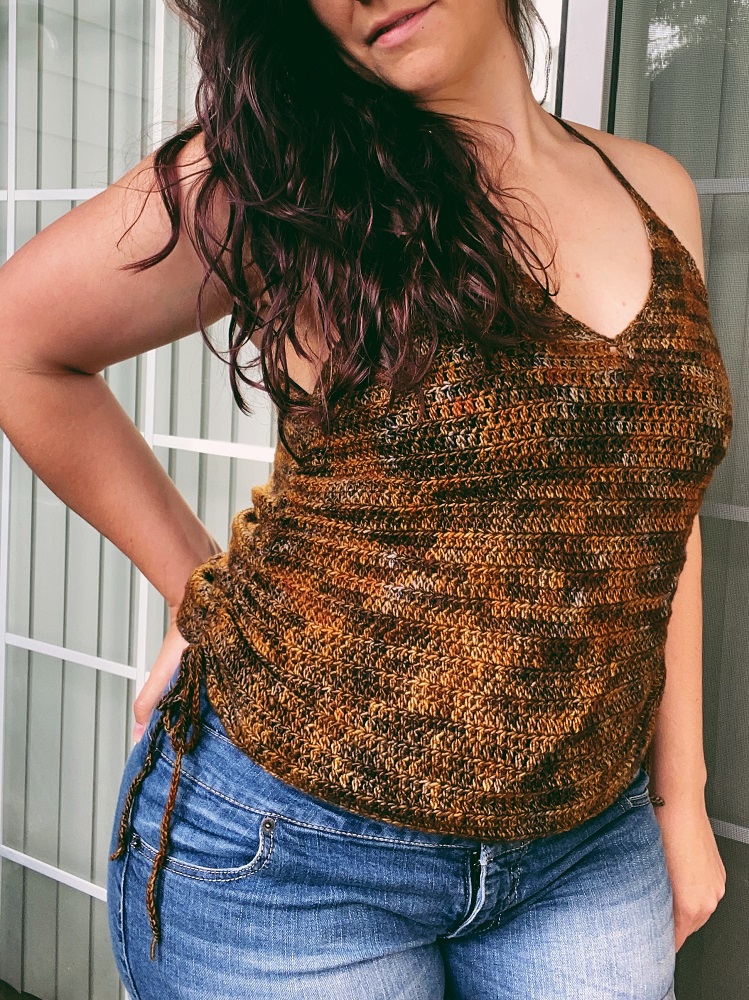
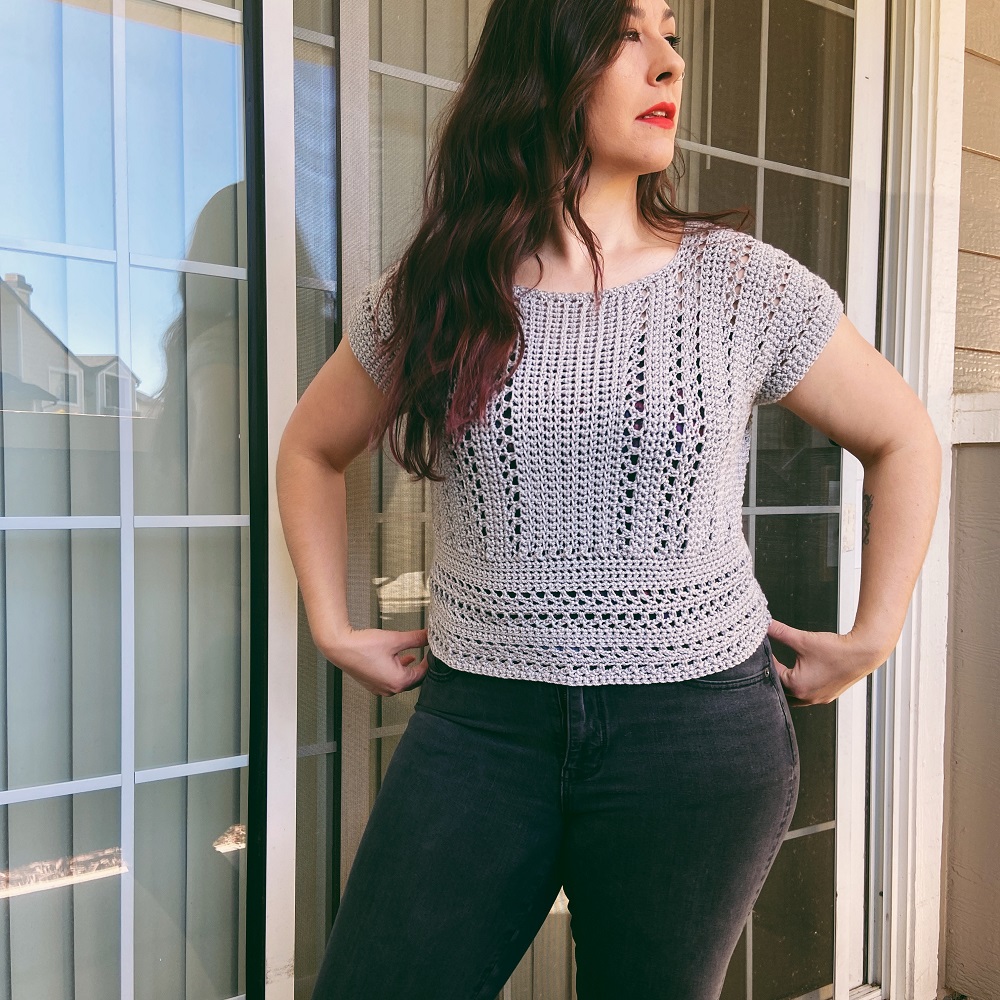
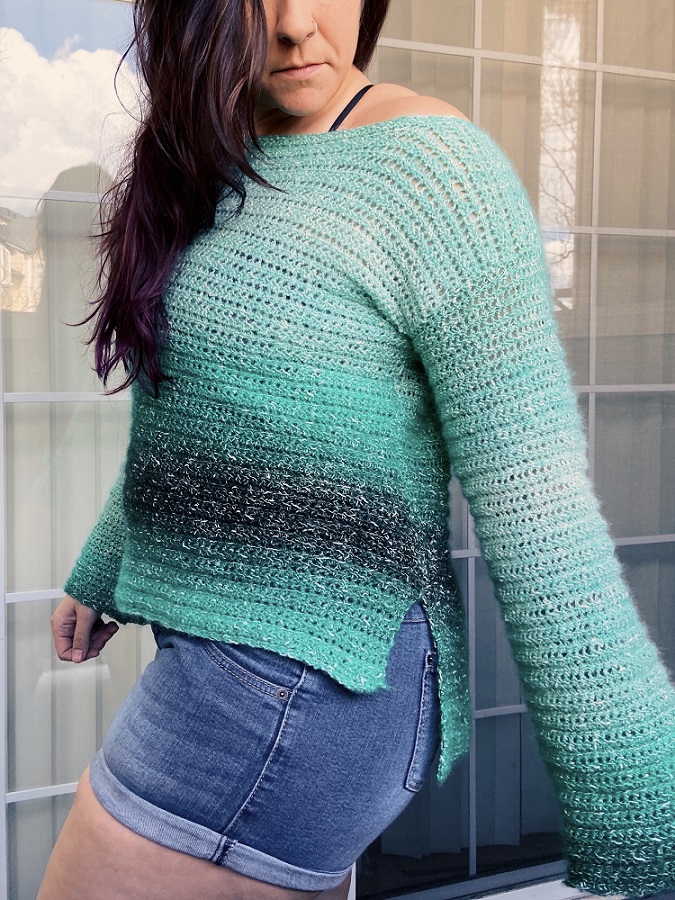
Below are some of the testers in their unique Find Your Beat Tanks. The yarn used is listed below each picture.
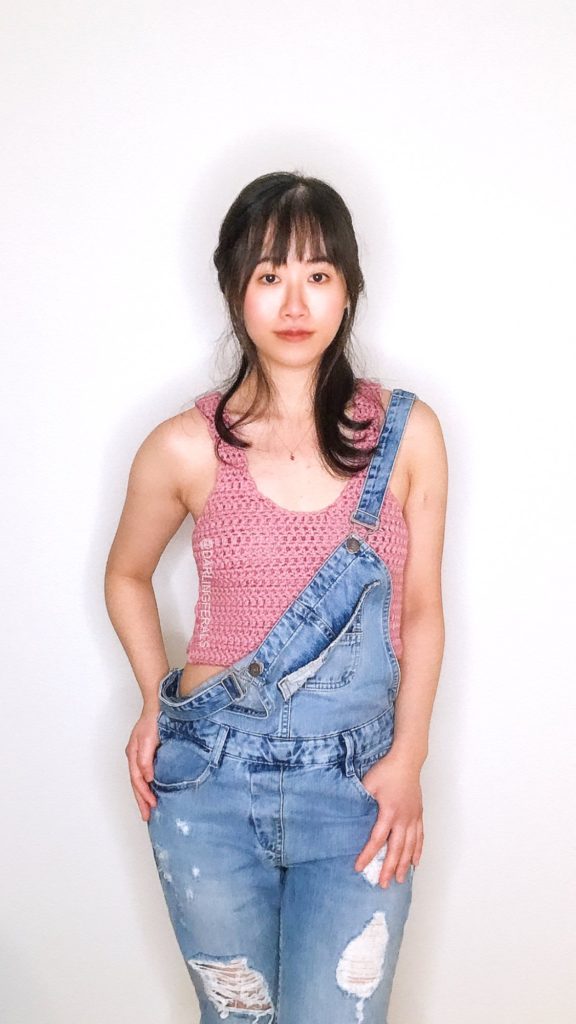

Makr Colour Mate (Rose Colour)

2 strands of Yarn Bee Spinesse

Lion Brand Ice Cream Cotton Blend (the cotton is discontinued but LB Ice Cream Yarn is still available)
Loops and Threads Impeccable
Brown-Sugar n Creme and Aran Fleck- Red Heart Super Saver

Caron Super Soft & Yarn Bee

Big Twist 100 Acrylic
Loops & Threads Creme Cotton and Lion Brand Truboo


Hobby Lobby Crafter’s Secret
Red Heart Super Saver – Marrekesh
Sweet Roll and Caron Pound of Love
Jarol New Arrival

Materials You Will Need
- yarn or yarn scraps of your choice
- 6.5 mm crochet hook
- tapestry needle
- scissors
- measuring tape
- removable stitch markers

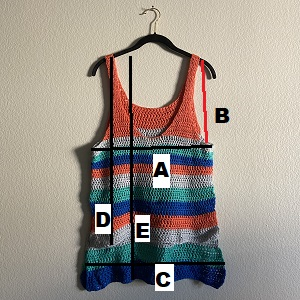
Note: The approximate finished dimensions are below. The sample was made with 0-2 inches of negative ease. Choose the measurements that include the amount of ease that you would like, or you can purchase the Ad-free PDF to access Custom Sizing Instructions to make your top to any dimensions you like.
| Sizes | (A) Bust | (B) Armhole Depth | (C) Hip (high-low version) | (D) Front Panel Length (high-low version) | (E) Back Panel Length (high-low version) | (F) Length (Cropped Version) | Estimated Yardage (high-low version) | Estimated Yardage (cropped) |
| XS | 27” | 6.9” | 31.3” | 19.9” | 23.9” | 15.5” | 335 y | 220 y |
| S | 30” | 7.4” | 35.6” | 20.9” | 24.9” | 16.5” | 400 y | 270 y |
| M | 34” | 8” | 40” | 21.75” | 25.75” | 17.1” | 465 y | 315 y |
| L | 38” | 8.6” | 43.6” | 22.6” | 26.6” | 17.7” | 525 y | 358 y |
| XL | 42” | 9” | 48” | 23.25” | 27.25” | 18.7” | 585 y | 415 y |
| 2X | 46” | 9.5” | 51.6” | 24” | 28” | 19.8” | 675 y | 475 y |
| 3X | 50” | 10.3” | 56” | 24.8” | 28.8” | 20.6” | 736 y | 537 y |
| 4X | 54” | 10.9” | 59.6” | 25.9” | 29.9” | 21.2” | 815 y | 590 y |
| 5X | 58” | 11.4” | 64” | 26.4” | 30.4” | 21.7” | 890 y | 651 y |
Gauge: 11 dc & 7 rows in 4 x 4 inches
Sizes: XS (S, M, L, XL) ((2X, 3X, 4X, 5X))
Skill Level: Easy
Techniques and abbreviations (US terms):
st- stitch
ch- chain
yo- yarn over
dc- double crochet
ss- slip stitch
sc- single crochet
inc- increase
cont- continue
dec- decrease
rep- repeat
sk- skip
pm- place marker
approx- approximately
nxt- next
hk- hook
Pattern Notes:
- This scrappy tank top is worked flat, as one piece, then seamed along the sides. We begin at the upper back, working up over the shoulders- one strap at a time. Next the straps are connected across and the front panel is worked top down. Then yarn is reconnected at the back to work the back panel rows top-down.
- You can choose to make your tank with a dramatic high-low shape or cropped. Seam the sides all the way down or leave a split hem, you decide! Buy the ad-free pdf for access to instructions for customizing the bust, hip, armhole opening, and overall length to whatever measurements you desire.
- The ch 2 does not count as a stitch throughout the pattern.
Color:
Find Your Beat Tank is all about expressing yourself creatively. Choose as many or as few colors as you like! Create your own color pattern or just wing it.
For my high-low tank, I used 4 colors which I labeled: A, B, C, D. I used color A for the upper back and straps, then did a simple sequential repeat gradually adding more rows for each color as I worked down each panel:
B-2r, C-2r, D-2r, A-2r, B-3r, C-3r, D-4r, A-4r, B-4r
PATTERN INSTRUCTIONS
Buy the ad-free pdf to access instructions for customizing the bust, hip, armhole opening, and overall length to whatever measurements you desire.
Beginning with the Upper Back & Working the Straps:
Ch 31(37, 39, 44, 50,) ((51, 57, 62, 68))
R1: 1 dc in the 3rd ch from hk and in each ch across. Ch 2 and turn. 29(35, 37, 42, 48)((49, 55, 60 ,66))
R2: dc2tog, 1 dc in each st across until there are 2 sts left, dc2tog. ch 2 and turn.
27(33, 35, 40, 46) ((47, 53, 58, 64))
Repeat R2: 4(4, 4, 4, 4)((4, 6, 6, 6)) more times.
You should have 6(6, 6, 6, 6)((6, 8, 8, 8)) total rows and 19(25, 27, 32, 38)((39, 41, 46, 52)) sts
Set up for the Straps:
pm 6(7, 8, 8, 9)((9, 10, 10, 10)) sts in from the top right edge, and pm 6(7, 8, 8, 9)((9, 10, 10, 10)) sts in from the top left edge. There should be 7(11, 11, 16, 20)((21, 21, 26, 32)) sts between the markers.
Starting the Right Strap:
R1: 1 dc in the first st and in each st across ending in the st with the marker. ch 2 and turn. 6(7, 8, 8, 9)((9, 10, 10, 10))
R2: dc2tog, 1 dc in each st across. ch 2 and turn. 5(6, 7, 7, 8)((8, 9, 9, 9))
R3: 1 dc in each st until there are 2 sts left, dc2tog. ch 2 and turn. 4(5, 6, 6, 7)((7, 8, 8, 8))
Sizes S, M, L, XL, 2X, 3X, 4X, 5X: repeat R2 one more time. 4(4, 5, 5, 6)((6, 7, 7, 7))
Right Strap:
R1: 1dc in the first st and in each st across. ch 2 and turn. 4(4, 5, 5, 6)((6, 7, 7, 7))
Repeat R1 until you have 15(16, 18, 19, 20)((22, 21, 23 23)) rows total including the dec rows from “Starting the Right Strap”. Try the top on to see if the length is to your liking. Add or subtract rows here if you are making adjustments to your armhole depth via the Custom Sizing Instructions.
NOTE: Your strap length may grow a few inches longer after blocking, depending on the type of fiber you are using. If you are using a natural fiber you may want to make your straps a couple inches shorter than you think you will need.
Right Strap Increase Rows:
R1: 2 dc in the first st, 1 dc in each st across, 2 dc in the last st. ch 2 and turn. 6(6, 7, 7, 8)((8, 9, 9, 9))
Repeat R1 2(3, 3, 4, 5)((5, 6, 7, 8)) more times.
You should have 3(4, 4, 5, 6)((6, 7, 8, 9)) total cup inc rows and 10(12, 13, 15, 18)((18, 21, 21, 25)) sts. Fasten off.
Starting the Left Strap:
Attach yarn to the top of the back panel where you placed the left side marker.
R1: ch 2 and place 1 dc in the same space as the marker and in each st across. ch 2 and turn. 6(7, 8, 8, 9)((9, 10, 10, 10))
R2: 1 dc in the first st and in each st across until you have 2 sts left, dc2tog. ch 2 and turn. 5(6, 7, 7, 8)((8, 9, 9, 9))
R3: dc2tog, 1 dc in each st across. ch 2 and turn. 4(5, 6, 6, 7)((7, 8, 8, 8))
Sizes S, M, L, XL, 2X, 3X, 4X, 5X: repeat R2 one more time. 4(4, 5, 5, 6)((6, 7, 7, 7))
Left Strap:
R1: 1 dc in the first st and in each st across. ch 2 and turn. 4(4, 5, 5, 6)((6, 7, 7, 7))
Repeat R1 until you have 15(16, 18, 19, 20)((22, 21, 23 23)) total rows from where you attached yarn for “Starting the Left Strap”. Try the top on to see if the length is to your liking. Add or subtract rows here if you are making adjustments to your armhole depth via the Custom Sizing Instructions.
NOTE: Your strap length may grow a few inches longer after blocking, depending on the type of fiber you are using. If you are using a natural fiber you may want to make your straps a couple inches shorter than you think you will need.
Left Strap Increase Rows:
R1: 2 dc in the first st, 1 dc in each st across, 2 dc in the last st. ch 2 and turn. 6(6, 7, 7, 8)((8, 9, 9, 9))
Repeat R1 2(3, 3, 4, 5)((5, 6, 7, 8)) more times.
You should have 3(4, 4, 5, 6)((6, 7, 8, 9)) total cup inc rows and 10(12, 13, 15, 18)((18, 21, 21, 25)) sts. Tie off.
Front Panel:
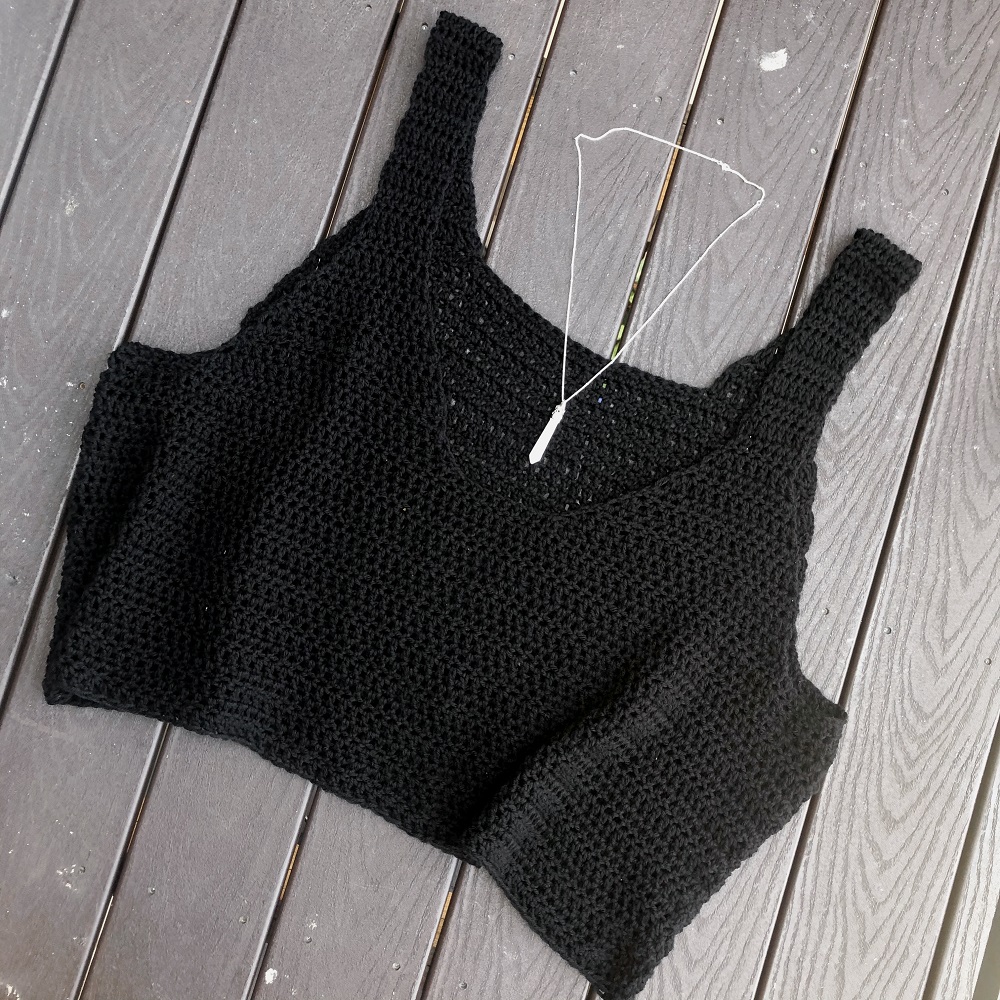
To connect the two straps and form the front panel, you will create one row that goes all the way across from the outer edge of one strap to the outer edge of the other strap. You will be extending the row at the outer edge of each strap and connecting them together with a chain. First, a small chain is made and it is connected to the outside of one strap, then you work across the stitches of the strap, and make a chain between the straps to connect them. Next. you work across the stitches of the second strap. Finally you chain off the end of the second strap to make one long row that you will continue to work across back and forth.
Ch 4(4, 6, 6, 6)((8, 8, 8, 8)) and connect the ch with a ss to the last st of the outer edge of one strap- where you tied off. (top right picture)
DO NOT CH 2
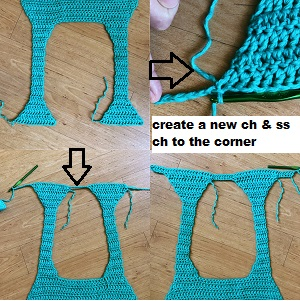
Set Up: make 2 dc in the first corner st (same place as the ss), 1 dc in each st across the strap until you have 1 st left, 2 dc in the last st, ch 5(7, 7, 8, 8)((9, 9, 10, 12)) between the straps (be sure not to make the chs too tight) and attach with a ss to the last st at the inner edge of the second strap. 2 dc in the same sp as ss, 1 dc in each st across until you have 1 st left, 2 dc in the last st of the second strap, ch 6(6, 8, 8, 8)((10, 10, 10, 10)) off the edge of the second strap. (bottom left picture)
*remember there is not a ch 2 before placing the 2 dc where you connect the ch with a ss to the corner of each strap.
R1: dc in the 3rd ch from hk, 1 dc in each ch and st across. ch 2 and turn. 37(43, 49, 54, 60)((65, 71, 76, 82) sts (bottom right picture)
R2: 1 dc in each st across. ch 2 and turn. 37(43, 49, 54, 60)((65, 71, 76, 82) sts
Cropped Version: Repeat R2 for a total of 15(16, 16, 16, 17)((18, 18, 18, 18)) rows or for the total length you desire. Fasten off.
High- Low Version: Repeat R2 for a total of 22(23, 24, 24, 25)((25, 25, 26, 26)) rows or the total length you desire. Fasten off.
Back Panel:
You will be extending the row similarly to how you did for the front panel by adding additional chains on either end of the upper back section. Once you connect the chain to the corner, do not ch 2 before working into that first corner stitch, just begin making dc’s.
Ch 3(3, 5, 5, 5)((7, 7, 7, 7)) and connect the ch with a ss off the bottom edge of the upper back section. (where your tail is from your initial starting ch)
Set Up: 2 dc in the same place as ss, 1 dc in each st across, 2 dc in the last st. ch 5(5, 7, 7, 7)((9, 9, 9, 9)) off the end of the panel. 31(37, 39, 44, 50)((41, 57, 62 ,68)) dc and 8(8, 12, 12, 12)((16, 16, 16, 16)) chs
R1: 1 dc in the 3rd ch from hk and in each ch and st across. ch 2 and turn. 37(43, 49, 54, 60)((65, 71, 76, 82) sts
R2: 1 dc in each st across. ch 2 and turn. 37(43, 49, 54, 60)((65, 71, 76, 82) sts
Cropped Version Only: Repeat R2 for a total of 15(16, 16, 16, 17)((18, 18, 18, 18)) rows. Fasten off. Follow the instructions below to weave in ends, block, and seam.
High-Low Version: Repeat R2 for a total of 17(18, 19, 20, 20)((20, 20, 21, 21)) rows.
Begin Hip Increases (High-Low Version Only):
R1: 2 dc in the first st, 1 dc in each st across, 2 dc in the last st. ch 2 and turn. 39(45, 51, 56, 62)((67, 73, 78, 84))
R2-4: 1 dc in the first st and in each st across. ch 2 and turn.
Repeat R1-4: two more times for a total of 43(49, 55, 60, 66)((71, 77, 82, 88)) sts and
29(30, 31, 32, 32)((32, 32, 33, 33)) rows.
Fasten off.
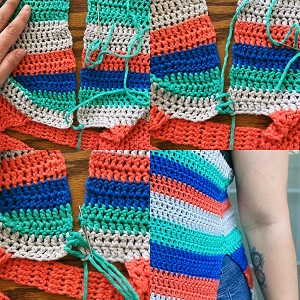
Blocking:
I recommend you block your tank before seaming up the sides. To wet block, soak your tank in cool water, adding the appropriate soap for the fiber used, for 20 minutes. Rinse and gently squeeze out excess water. Place your tank on a large towel and shape. Place a second towel over the top, and roll the towels together like sushi. Put pressure on the towels to soak up as much water as possible from your project. Unroll, and lay your tank out to dry on blocking mats or on a fresh towel.
Seaming:
Weave in loose ends. Seam the two panels of the tank together along the sides from the underarm down, as far as you like. I recommend using a mattress stitch working vertically through the edges of the right side of each panel. This technique creates a near invisible seam. I seamed a total of 6 ¾ inches from the underarm down for a generous split hem.
What yarns will you use to make your own unique version of the Find Your Beat Tank???
I hope that you have enjoyed following this free scrappy crochet tank top pattern and it fits well! If you have any questions along the way, don’t hesitate to contact me via email at tigerseyehandmade@gmail.com
I’d love to see your finished piece! If you post it on IG please tag me @tigerseyehandmade & use the hashtag #findyourbeattank to share it with the group!
If you’d like access to instructions for customizing the measurements of this tank to fit any dimensions you’d like, purchase the Ad-Free Pattern HERE in my pattern shop.
Shop this pattern on Ravelry
Shop this pattern on Etsy


I absolutely love my Find Your Beat Tank! I’m planning on making another for myself with a different colour combination and another variety of yarn. Thanks to the versatility of the pattern and the other yarn recommendations from the other testers…. i know my next tank will be perfect!
Thank you!!!! That is so awesome to hear that you will make another! I can’t wait to see what you come up with. I know it is going to be beautiful!